Dynamics 365 FinOps Unified developer experience
Hello the Community ! This is for me the most important feature for Dynamics 365 F&O for several years ! Discover the big change on the DEV & Admin part. Unified developer experience is now there to unify the way we work every day with the convergence on Power Platform, Dataverse, and the journey of One Dynamics One Platform: ODOP. Discover how you can develop now locally!
Table of Content :
Introduction
First of all, it’s maybe the most important topic I’ve seen for several years now in Dynamics 365 F&O space, hot topic, and breaking changes!
As a guy always pushing Power Platform with Dynamics 365 F&O, and/or also talking about One Dynamics One Platform / Convergence: this time it’s a reality. As I am writing this article, we are in September 2023 in Public Preview. So like an early adopter, we can expect some changes in the coming weeks or bug fixes. Update June 2024 : Speaking of which, please click & check the end of the article with all latest updates (GA is for June 2024 !)
Also, before starting to jump and explain in this large blog post the whole thing behind the scenes of the Unified Developer experience, I wanted to highlight the whole team at Microsoft for bringing that for us !
Several things to consider too, I will of course suggest reading the whole MS Doc Learn and highly recommend joining the Viva Engage Group !
GA date is now known (June 2024) and I’ll update this article as soon as I have more information to share with you or maybe because I will want to add some new chapters based on the feedback I have from you. Don’t hesitate to share, ask for Q&A at the end, or also watch my DEMO in the video. I’ll also have a session (where you can ask me anything - AMA) in a few days at Dynamics 365 User Group India.
You can already try it, but also I’ll suggest still using Azure Cloud Hosted Environment for the project/production GoLive soon. Don’t go with that to slow the progress of your project because you have a global crash of Visual Studio and you lose all your code right? (This case will not happen I guess but still) - I think Microsoft will not depreciate the DevBox in Azure (including BuildVM of course) before 2025 - BUT, there is always a BUT, I will think that for new projects coming in end 2024, you should go with it… Either way, since it’s a real breaking change, I will suggest trying it on your hand, on a tenant where you can deploy this type of DevBox and see the whole flow and setup to be done.
LCS is still a thing (yet) so I would say we are in hybrid mode, where you can choose both things. On my side, you know that I will choose the one I present now (LCS Portal can still give nightmares nowadays …)
Again the goal is/will be to (step by step) go ONLY in PPAC (Power Platform Admin Center) and no more LCS just for F&O deployment. It’s also better for Microsoft to push new features as a whole (and not rely on different types of infrastructure) ; like my previous article about ODOP Analytics: Synapse Link.
This is also true even for deploying F&O Trial Environment, submit a ticket to support, and soon all types of environment strategies you like. But let’s go to the next chapter for that!
Environment Strategy - Admin
So let’s go first on the ADMIN part, my favorite. As you know, let’s start with that before even talking about development!
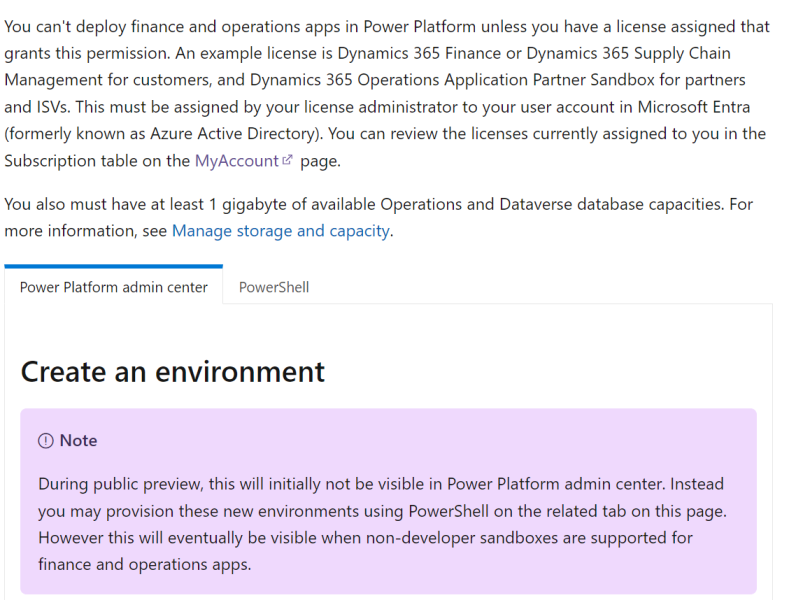
First of all, this new Unified developer experience can be tested only on a tenant in which you have the right D365 F&O license. The global change is that: when you had to setup your LCS project, it was required to have the 20 licenses minimum. But maybe no license was not assigned to YOUR account. And it was possible for you to provision a new Azure Cloud Hosted Environment and start doing development.
Now, let’s forget completely LCS, well not totally… but most of it - only for the DevBox (TIER2 and Production still - at the moment - are handled in LCS) - so it’s like a hybrid mode until all types of environment can be managed like the F&O UnO DevBox in PPAC that we will do now. If I talk about UnO it’s the name behind this new type of environment. I will use a lot this name, so don’t forget !
If you have 20 D365 Finance or SCM (the minimum as you know) - When you purchase a license for any finance and operations app, such as Dynamics 365 Finance or Dynamics 365 Supply Chain Management, your tenant is entitled to 60 GB of operations database capacity and an additional 10 GB of Dataverse database capacity.
My side, as a Partner here in this tenant I have some D365 Finance and other D365 CE licenses, so my whole tenant is entitled with large amount of storage of Dataverse and F&O too.
Globally a new UnO DevBox by default with contoso DEMO content on it will require 2GB dataverse and 6GB for F&O. If you don’t have enough of that, you will not be able to provision it.
Second, now, go to your account to see if you have a license assigned to your account.
The most important part here, is to check if you have “Common Data Service for Dynamics 365 Finance” or “SCM”
Speaking of Partner licenses, there is a bug now on the template deployment that we will do via Powershell just after - because this kind of license is linked to Project Operations in which there is a current bug (again this topic has been talked into the Viva Engage Group)
Right now, on the Customer tenant level (where we have “real” licenses” - like D365 Finance or SCM) it will work of course. Dynamics 365 Commerce doesn’t have yet a template to deploy a Devbox with all commerce features on it. (will come surely by the EOY)
Also as we speak in Public Preview, to deploy this UNO DevBox, it’s ONLY possible in PowerShell ! Not visible as PPAC UI.
The system admin that will have access to this environment (like environment admin) will be the account that start this process of provisioning.
So Launch Powershell ISE on your laptop. And first run this cmd if you didn’t had installed this Library (if yes you can skip it) :
#Install the module

Install-Module -Name Microsoft.PowerApps.Administration.PowerShell -Force
Second part is connecting to your account and put the JSON template of your environment (of course DevTools enabled is important, and DemoDataEnabled is if you want a contoso demo data on it by default)
Write-Host "Creating a session against the Power Platform API"
Add-PowerAppsAccount -Endpoint prod
#To construct the json object to pass in
$jsonObject= @"
{
"PostProvisioningPackages":
[
{
"applicationUniqueName": "msdyn_FinanceAndOperationsProvisioningAppAnchor",
"parameters": "DevToolsEnabled=true|DemoDataEnabled=true"
}
]
}
"@ | ConvertFrom-Json
Last but not least, start the provisioning :
# To kick off new environment deployment
# IMPORTANT - This has to be a single line, after the copy & paste the command
New-AdminPowerAppEnvironment -DisplayName "UnoEnvName1" -EnvironmentSku Sandbox -Templates "D365_FinOps_Finance" -TemplateMetadata $jsonObject -LocationName "Europe" -ProvisionDatabase
Or if you like to install preview release, please take care of the fact that you should be in the Early Release Cycle of Dataverse. You have to setup it at first (can’t change it after)
New-AdminPowerAppEnvironment -DisplayName "dynagile-beta" -EnvironmentSku Sandbox -Templates "D365_FinOps_Finance" -TemplateMetadata $jsonObject -LocationName "Europe" -ProvisionDatabase -FirstRelease:$true
Here you put the right name of your environment (because no more than 20 characters !) - choose the right location in datacenter (like me Europe, could be Canada , see regions below)
The available templates are based on the license assigned to your account, the mapping is :
So you will launch, and wait, wait , wait… :) - don’t worry if you don’t see an error right away, it’s good = you can even cancel the command. And refresh PPAC UI (by the way, aka.ms/ppac is a good way to go straight forward to the admin center - you should see your environment in Preparing stage. It will take 1h30 in average - like a TIER2 in LCS in fact - (large better than Azure Cloud Hosted Environment right ? Mostly it has been around 6 hours for several years now - if no error… I know you are smiling by reading it, including the Preparation failure when applying Service Update or like the VC C++ to upgrade for 10.0.36 etc…)
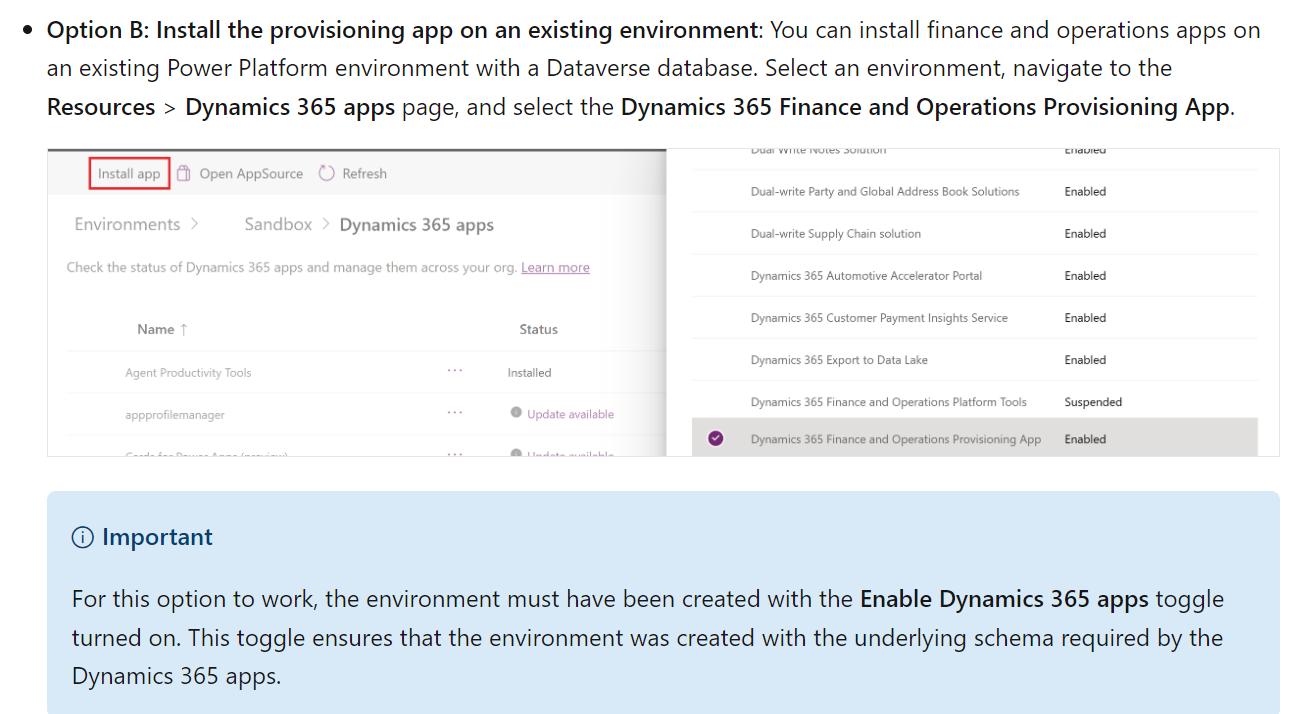
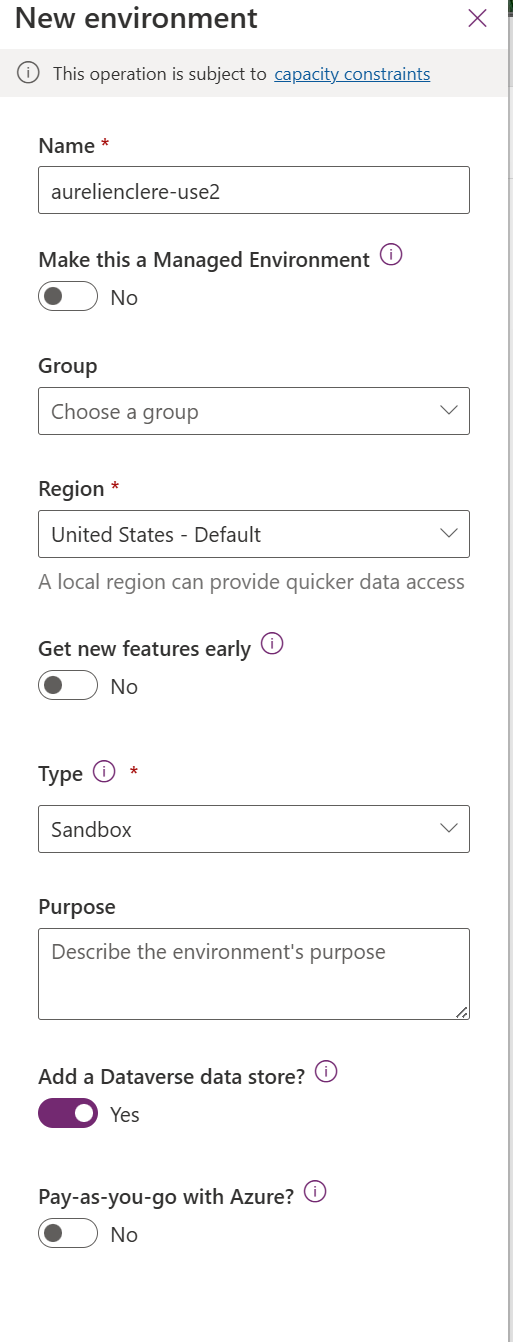
You may also have an another case, where you already have a Dataverse with existing D365 CE Apps, and you want to provision and activate the DEV UnO side like this
Now that you wait, I will explain some importants stuff on a one I have already created few weeks back.
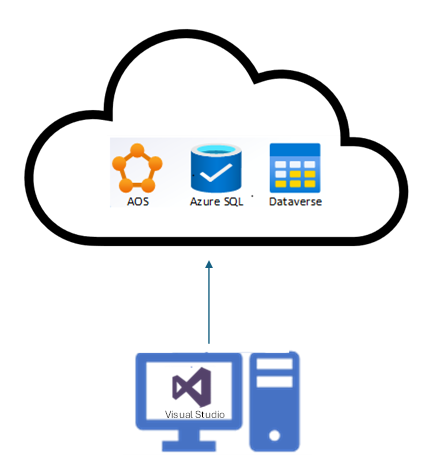
So, this type of environment is FULL cloud, meaning like TIER2, it’s deployed with the database behind (SQL), 1 AOS etc… you DON’T manage anything else. Like a D365 CE / Power Platform Developer, he/she needs a developer environment, we can work right away after on this Dataverse. Now, same thing for us in F&O space. We will see the DEV part with Visual Studio after.
As part of the capacity-based model, all environments are given the same level of compute performance be it sandbox or production environments. This is based on the number of user licenses purchased and it dynamically scales up or down as your license quantities adjust.
With the unified experience, customers no longer deploy all-in-one VMs. Instead, you can download the Power Platform and X++ developer tools on a computer with Visual Studio installed. Next, you can build new solutions that span the entire platform set of capabilities, and then deploy those to a sandbox environment that is provisioned through Power Platform admin center.
Several points :
The good thing is that you have already done the “link” between Dataverse and F&O, remember I was saying at some point Dataverse would be mandatory, now here we are, because you have to provision through PPAC so… the loop is now closed, but also it’s a good way because we had in the past few years a lot of Q&A about how to link correctly F&O to Dataverse in LCS (like for installing LCS Addin)
You already have the Dual Write set up for you and linked
You already have the Virtual entity solution installed and configured, you can activate Virtual Table/Entities into same Dataverse and start building Power Automate / Power Apps with the Dataverse connector.
You can of course use Synapse Link (ODOP: Analytics with Delta Lake)
With SCM template, you will already have the Inventory Visibility Micro Service/ Planning Optimization (I don’t know yet if ALL but surely yes, micro services will be installed via PPAC / Dynamics 365 Apps but I guess yes since those type of micro service have been built in Dataverse side)
The only thing we don’t have (YET) is to apply Service Update, Proactive Quality Update, restart services, or choose the right version of D365 F&O you need. As of now, when I provision a new one we are at 10.0.35 but what if I wanted to deploy 10.0.34 ?
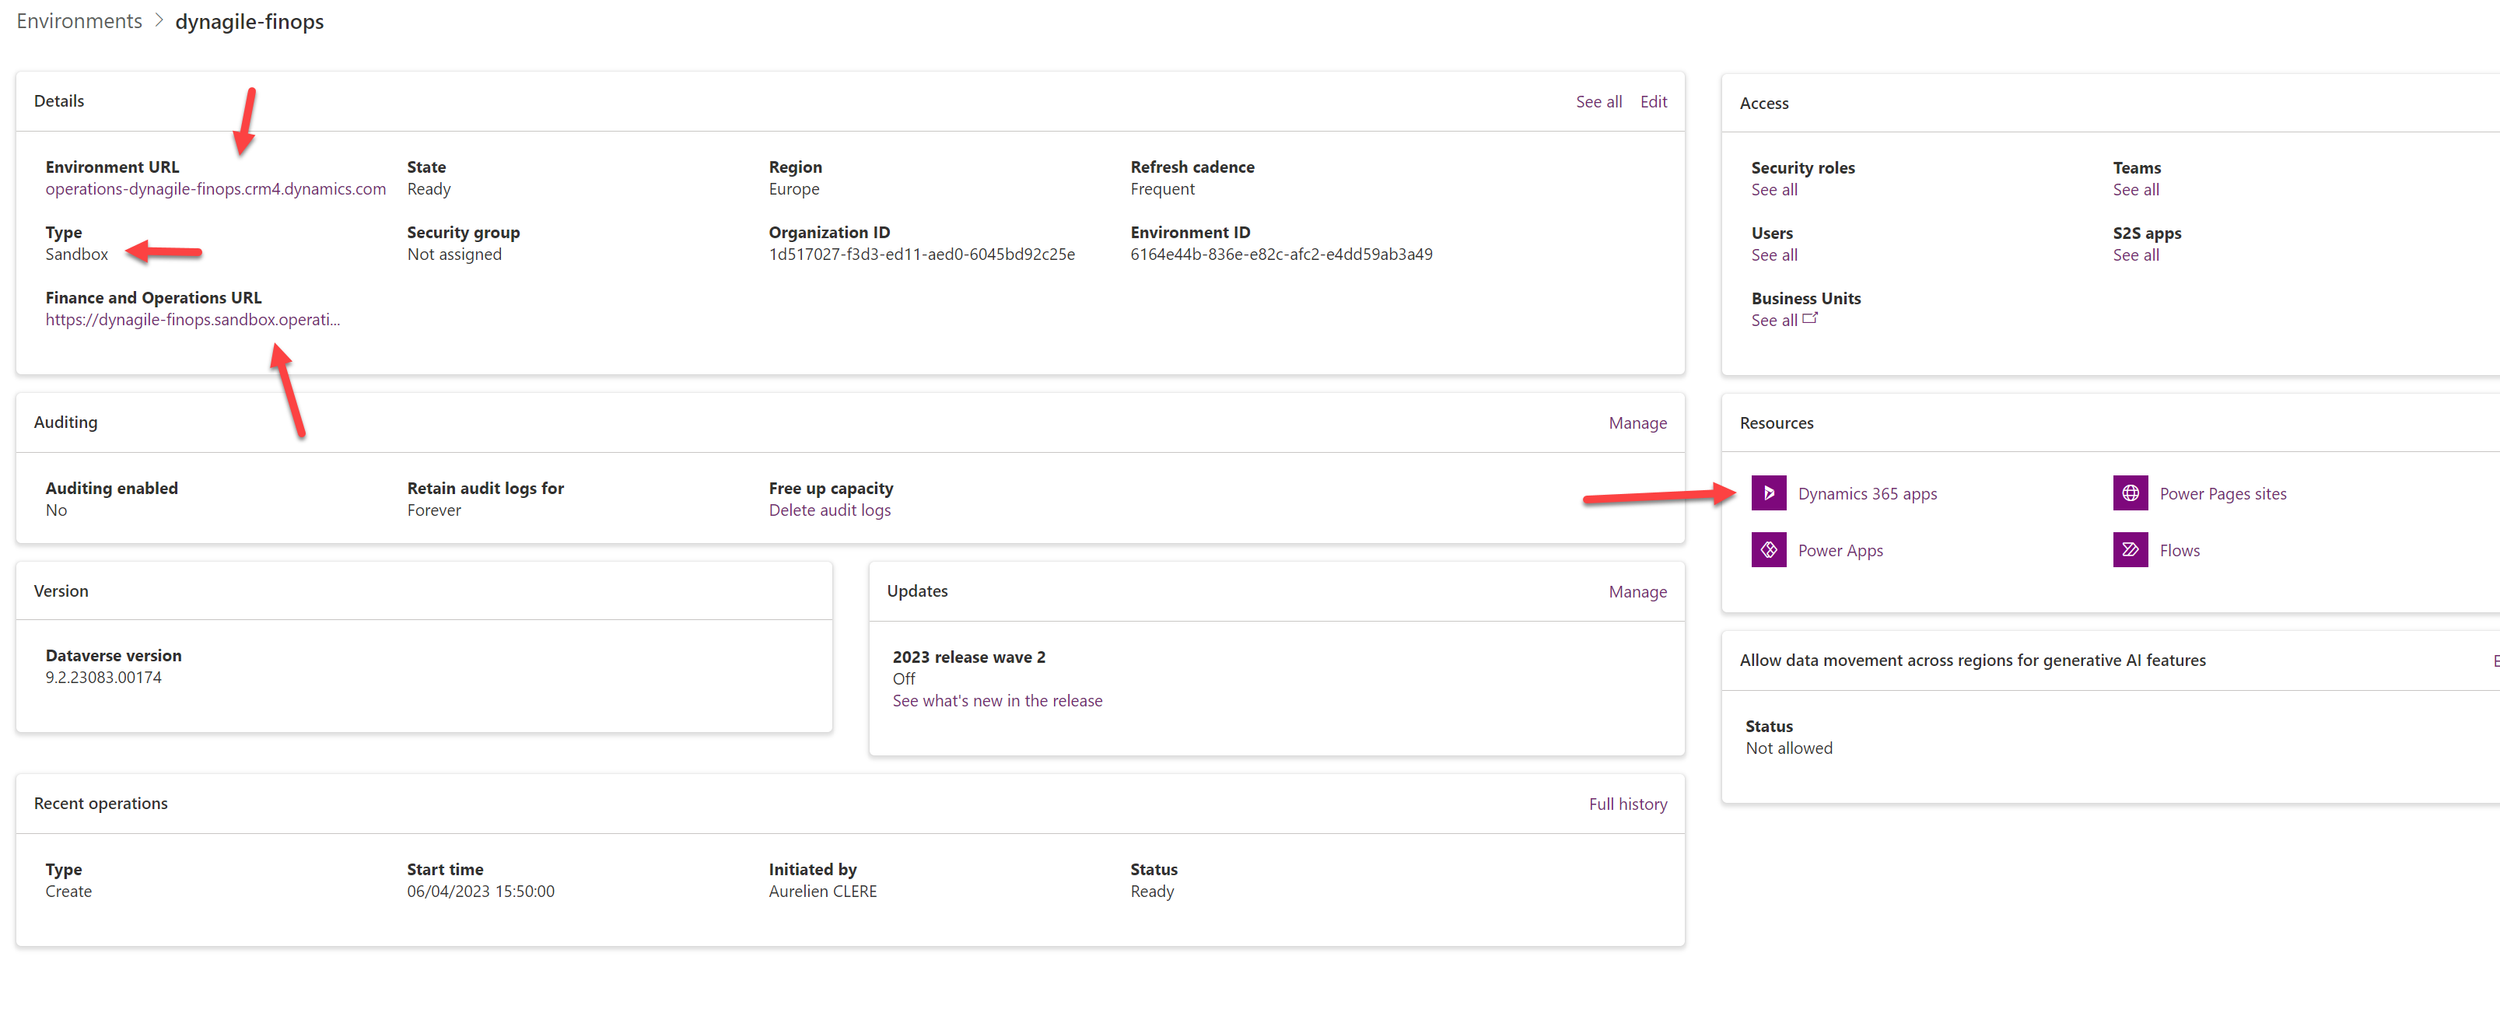
When it’s good, you will see your environment like this, with the Dataverse Web URL including the one of F&O
In this case, you can (eventually, and yes eventually don’t know if it’s good or not, depends of your DEV team) but you could work on the same UnO DevBox. My side, I will still maybe stay on 1 DEV = 1 DevBox for him/her - just to avoid working on the same object/DEV & deploy things at the same time.
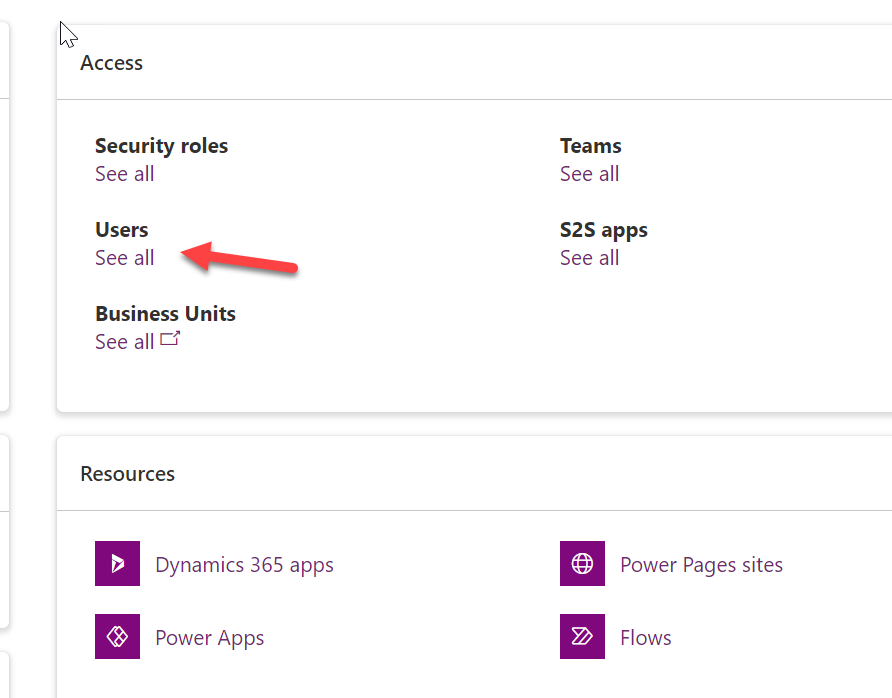
Either way, you can change access control. Go through User and him/her as System Admin in Dataverse/CE side. Bad thing (yet) is you have also to do it once more time in F&O side as you know I think. (no global sync of access control between the “2” platforms)
Like explained earlier, if you go to Dynamics 365 apps, you will see also pre-configured & installed solutions
If we talk a little bit about Dynamics 365 Finance Operations Platform Tools, that is the main one to manage the deployment part. We will talk about in more details in the last chapter, but globally it’s here where you will see all deployments informations
Finally, but again we will go deeper into this topic of ALM later, you have the current models (X++) deployed on this UnO DevBox including some histories and logs.
But … “Aurelien, what about -standard Sandbox - TIER2,3,4,5 or even PROD for F&O ???”
Well… as of now, to make it short, that is also the goal of Microsoft. But, not yet! You will still use LCS for that. But in the end, we will have the possibility to deploy TIER2 (without no MORE new additional specific licenses, but only need database storage - yes this part of storage as you can see will be very important in the coming months)
“Beyond that, there are no strict limits on how many environments you can create. This differs from LCS where each sandbox and production environment slot had a predetermined purchase.”
The goal is to (either way), pick a Dataverse with maybe already CE Apps and ask to provision a new Dynamics 365 App on this environment like Finance or ProjOps or HR or whatever F&O Apps. Or create a Dataverse with just Dynamics 365 Finance App and that will provision a “TIER2” behind the scenes, like we used to do it in LCS before.
For production deployment, don’t know how it will work since you need a Fast Track Approval first (if you compare to LCS)
For Commerce/Retail, again LCS included CSU or e-Commerce part, don’t know yet how they will converge that from LCS to PPAC.
For trial F&O environment, this is VERY VERY good ! Indeed, imagine a customer that already deployed D365 Sales App, you want a quick POC / Demo - you can copy a Production Dataverse of D365 CE Sales, to a new Sandbox, ask D365 Finance Trial license, activate the D365 Finance App (that will create the “like TIER2 LCS”, including already all solutions needed like before : dual write, virtual entity, etc… and you can showcase that very quickly. If you want to learn more, you check this part HERE.
Finally, you may ask but what about costs (Pros/Cons) Aurelien ?
I see what you already say in your head hehe ! Yes, you will need to have a license to provision an environment. Well if you were on D365 CE space, you can’t access the environment if you don’t have the license, so for me, it was a matter of time that Microsoft checked that too for F&O…
Database storage, is for me, the MOST important part of 2024. As you have seen, no more Azure costs, no more RDP/Bastion, security, waiting for the deployment, managing the VM, access, etc… I think I forgot some of them, but globally, you will save costs on this part (like any IaaS going to SaaS)
We will see that in more detail in the ALM/DataALM part in the last chapter, but of course you will be able to copy your production database on it (yes without having to refresh an LCS TIER2 Sandbox and backup it, restore it manually in the VM like we used to do) = but if your PROD database is like 100GB, you will also have 100 GB * number of Uno DEVBOX you will deploy.
You will have something like this (I see that on a lot of customers right now) : globally remember that is part was ALWAYS been needed to be checked and bought (storage wasn’t free : see licensing guide for that - even for F&O) , but no blocking point and neither a report like this before in LCS. So now it’s available in PPAC.
See a typical example of F&O cutomer, where I have 100 D365 Finance , 46 SCM, 106 Activity, so not the biggest customer of the world for Microsoft, but hope they can give more GB for that. Because the fact is : for each GB per month is 30€ per month in average (public price) so this is quite huge for me / opinion.
Of course, the way to go is ARCHIVE. Or maybe delete (very?) old past transactions automatically after post-copy refresh of Database ? But Microsoft is also working on this topic - they know that we need to have maybe less transactions after copy to reduce the global storage of all UNO DevBox.
I will do a global article in the coming weeks about it. But first, Microsoft need to push something in GA, no ?
DEV Side ;)
Install now Visual Studio 2022 (2019 isn’t supported now)
So well, first, you need to install it ;) - hope you have already an MSDN or VS Subscription (Pro or Enterprise)
a. A Windows 11 machine with 8GB RAM minimum (16GB vastly preferrable) - 16GB is more for me required and SSD on your laptop but that something quite common nowadays.
b. A clean install of Visual Studio 2019/2022, any edition with workload ‘desktop development with .net’. If your version has either the Power Platform Tools for Visual Studio or the X++ Tools extensions installed, please remove them before you begin. See in detail the requirements of Visual Studio for X++ here.
c. SQL Server LocalDB (preferably) or SQL Server 2019. If using SQL Server LocalDB, please refer to the setup instructions at the provided link and perform a basic install. I will highly suggest going with SQL Server Express 2019 is sufficient. It will be needed after for the Cross-Reference database.
d. Installing 7zip software, yes please do it, you will save time to extract all the X++ Source code of Microsoft (going from 3.5GB ZIP to 16GB extracted)
Remember, you will be on your own laptop, so please consider those steps only 1 time for ALL the customers you are working on.
After this part, you can open up Visual Studio like me / go in Admin mode & “continue without code” :
(NB : Please consider this screenshot without AOT or Dynamics 365, my side it was already done - so that’s why you already see Dynamics 365 F&O extension and AOT in this screenshot)
The goal here is to install the Power Platform Extension (VS) ; it’s required and well it’s a perfect way to see the convergence of DEV : C# & Power Platform and X++ : all together ! (CE Development and X++ development on the same machine) : after all you can develop a plugin in C# for CE side and also extend a Data Entity of F&O in X++ for the same kind of change requests right ? Like I explain in this article
Please remember to check if updates available very often (my case it was) - Otherwise check : “Power Platform Tools” and install it like me
After that, go to :
In the Tools menu, select Connect to Dataverse.
Select the desired options in the dialog and select Login.
Choose not to use the signed-in user if you need to use another account with a Visual Studio license. Enter the credentials as necessary to match your development user account.When presented with a dialog to select a solution, select an available solution and then choose Done.
You will be presented with a list of Dataverse organizations (databases deployed). Find the UnO DevBox environment created for online development and connect to it.
HERE : Display always the global list of ORGA , don’t choose Sign in as current user if this is not the same as the account used & already connected to Visual Studio
You can see the environments I created before in Powershell - Pick the one you have created before.
HERE : pick Default one, or ONLY if you will create some specific components of D365 CE/Power Platform the good way is to create a specific solution/publisher for you.
After that, if you DIDN’T had YET installed/downloaded the source code (X++) of Microsoft of this version of the UnO DevBox (like me 10.0.35) , you will have a popup to download locally.
After installing the Power Platform Tools extension and connecting to the online Dataverse sandbox environment, you'll be presented with a dialog to download the finance and operations Visual Studio extension and metadata.
Metadata will be there, you can cleanup too this folder if you start from scratch : C:\Users\YOURUSER\AppData\Local\Microsoft\Dynamics365
Inside, you will have the VS F&O extension to install. Install it and meanwhile, you can extract the PackagesLocalDirectory (with 7ZIP like explained before - can take almost 30min to extract depends on your PC config…)
My side, I just created an AOSService folder on my Local C Disk. But the good way will be to create sub-folders PER version (even per Customer in fact) you are working on.
After doing that, open up VS again, and see those options recommended by default.
Last step is to configure the F&O extension. For that, go to :
If you don’t see that, please click on Infolog button, sometimes this menu can also take time to appear (will be enhance by Microsoft in future VS F&O extension release)
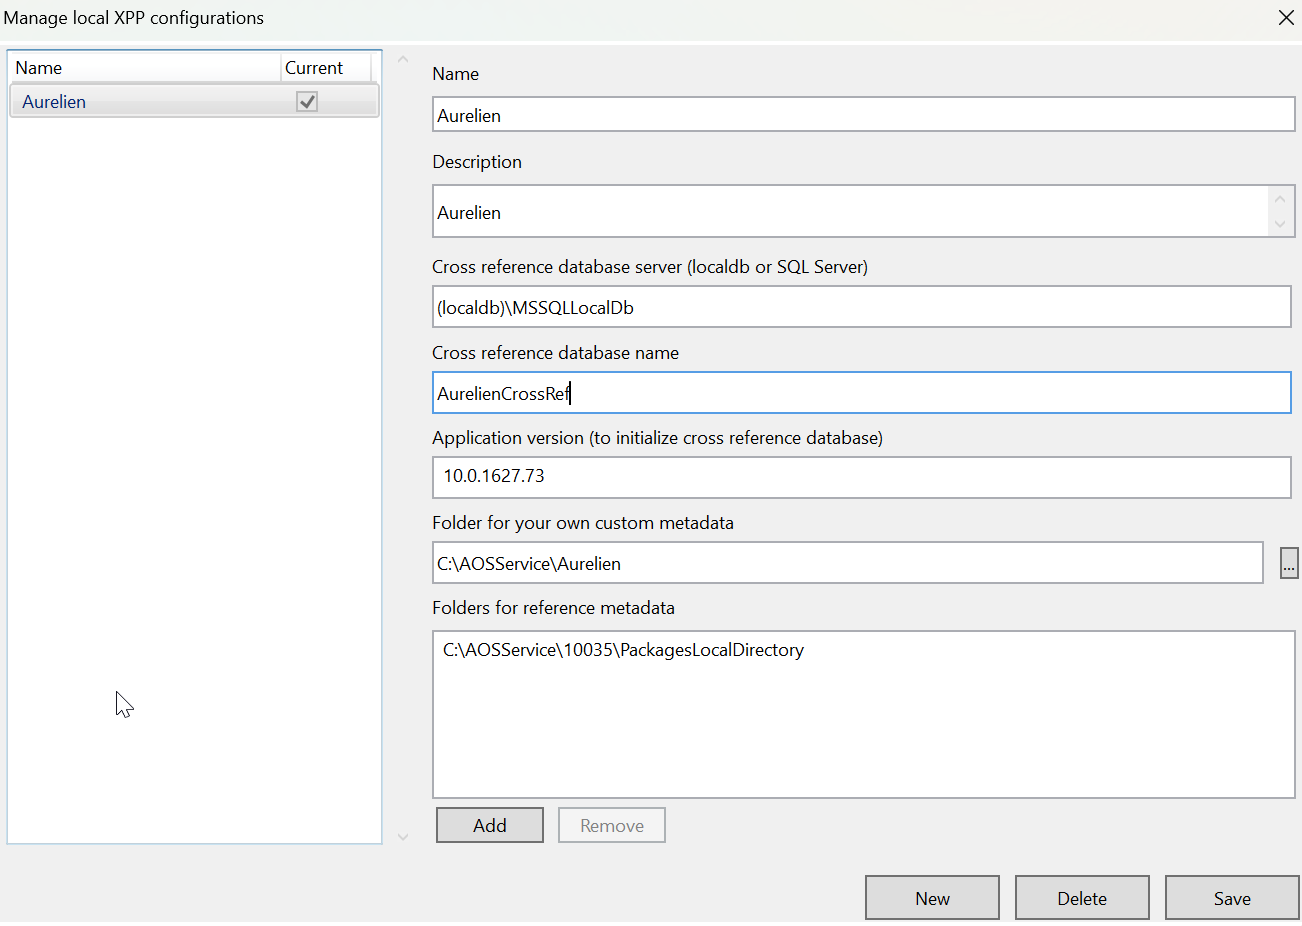
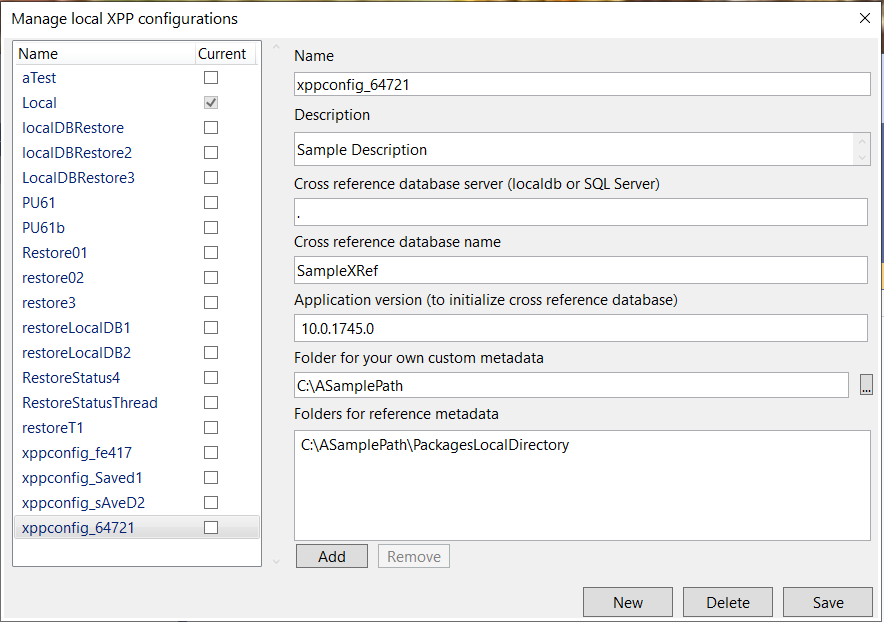
Here is where you will do the global setup for every customer you are working on. On my side I use LocalDB of Cross Ref DB (because it’s already installed where you install VS) , I created a specific subfolder for this customer where I will put my OWN custom model(s) and also the reference metadata extracted before.
Ensure that you entered the correct value(s) for fields with errors. For example, use "(localdb)\." if you're using LocalDB. Also, if you're using LocalDB, you may need to first configure and test it. Consider issuing the following command from a Command prompt: sqllocaldb create MSSQLLocalDB -s
At the end, you can have something complex like this
After that, the cross ref DB will be restored, so that you can use F12 (Go to Definition) and see also Find All References.
You can now start doing DEV ! Globally by checking my DEMO in video it will be more easier to show you everything !
But here are some “basic” How-To : So the first thing is of course to display AOT. (VS / View / Application Explorer) - Right click on an object , view code or view designer
(if you have an error when opening some class files - that are xml behind the scene - you must install Modeling SDK as part of Visual Studio individual components : The Text Template Transformation component is automatically installed as part of the Visual Studio extension development workload. You can also install it from the Individual components tab of Visual Studio Installer, under the SDKs, libraries, and frameworks category. Install the Modeling SDK component from the Individual componentstab)
You can connect to several Dev Ops (1 per customer) and create multiple workspaces, here you can do that because you have created several XPP / Metadata Config like we have done before and switch between them. The reference metadata folder will be maybe the same (like the same version of D365 F&O) but the own customer metadata will be one per customer.
In my case, I use a simple config, 1 Dev Ops 1 Workspace 1 version of code.
Here we are like we used to do before in Azure Cloud Hosted Environment. Creating model, creating VS Projects etc… : that doesn’t change
Like my side, standard VS Project F&O template, creating a new model, just 1 EventHandler of class to try debug and 1 extension of FORM.
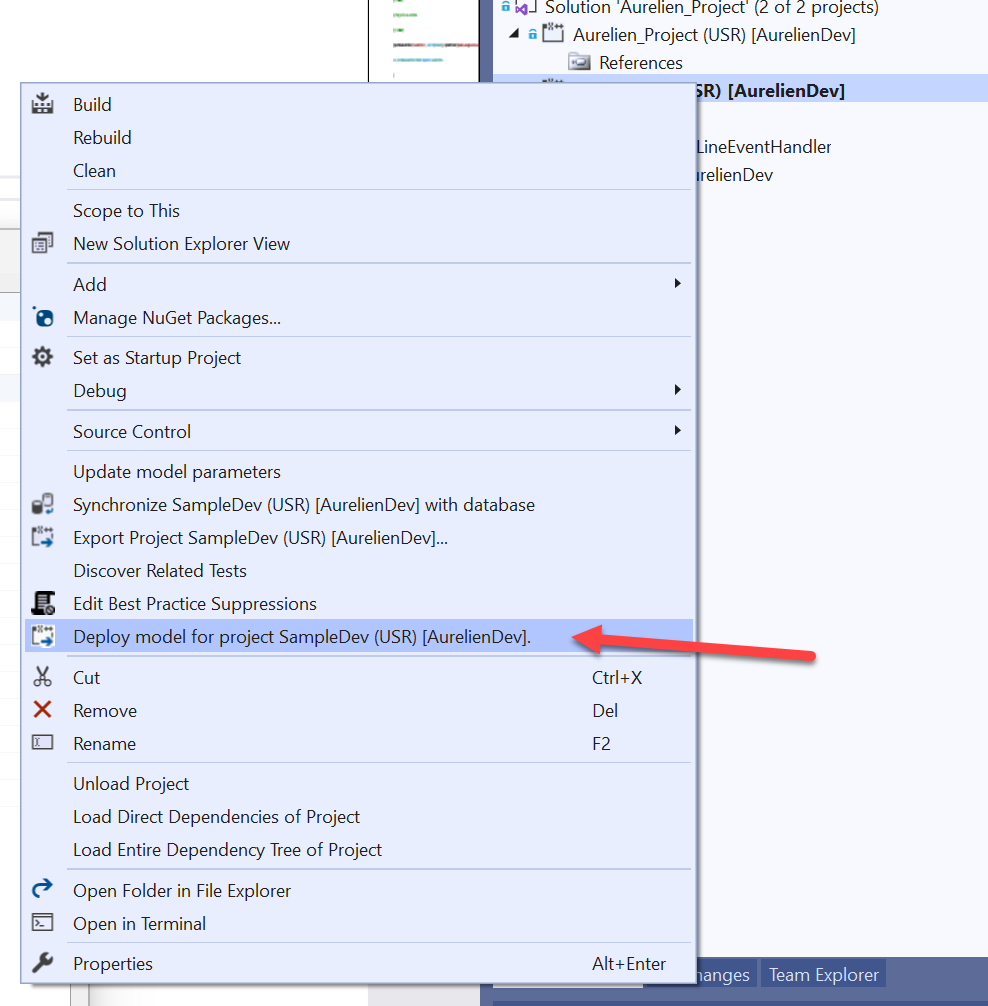
On VS Project Property, we have 1 more new step to deploy automatically the build incrementally locally to my UnO DevBox Full Online.
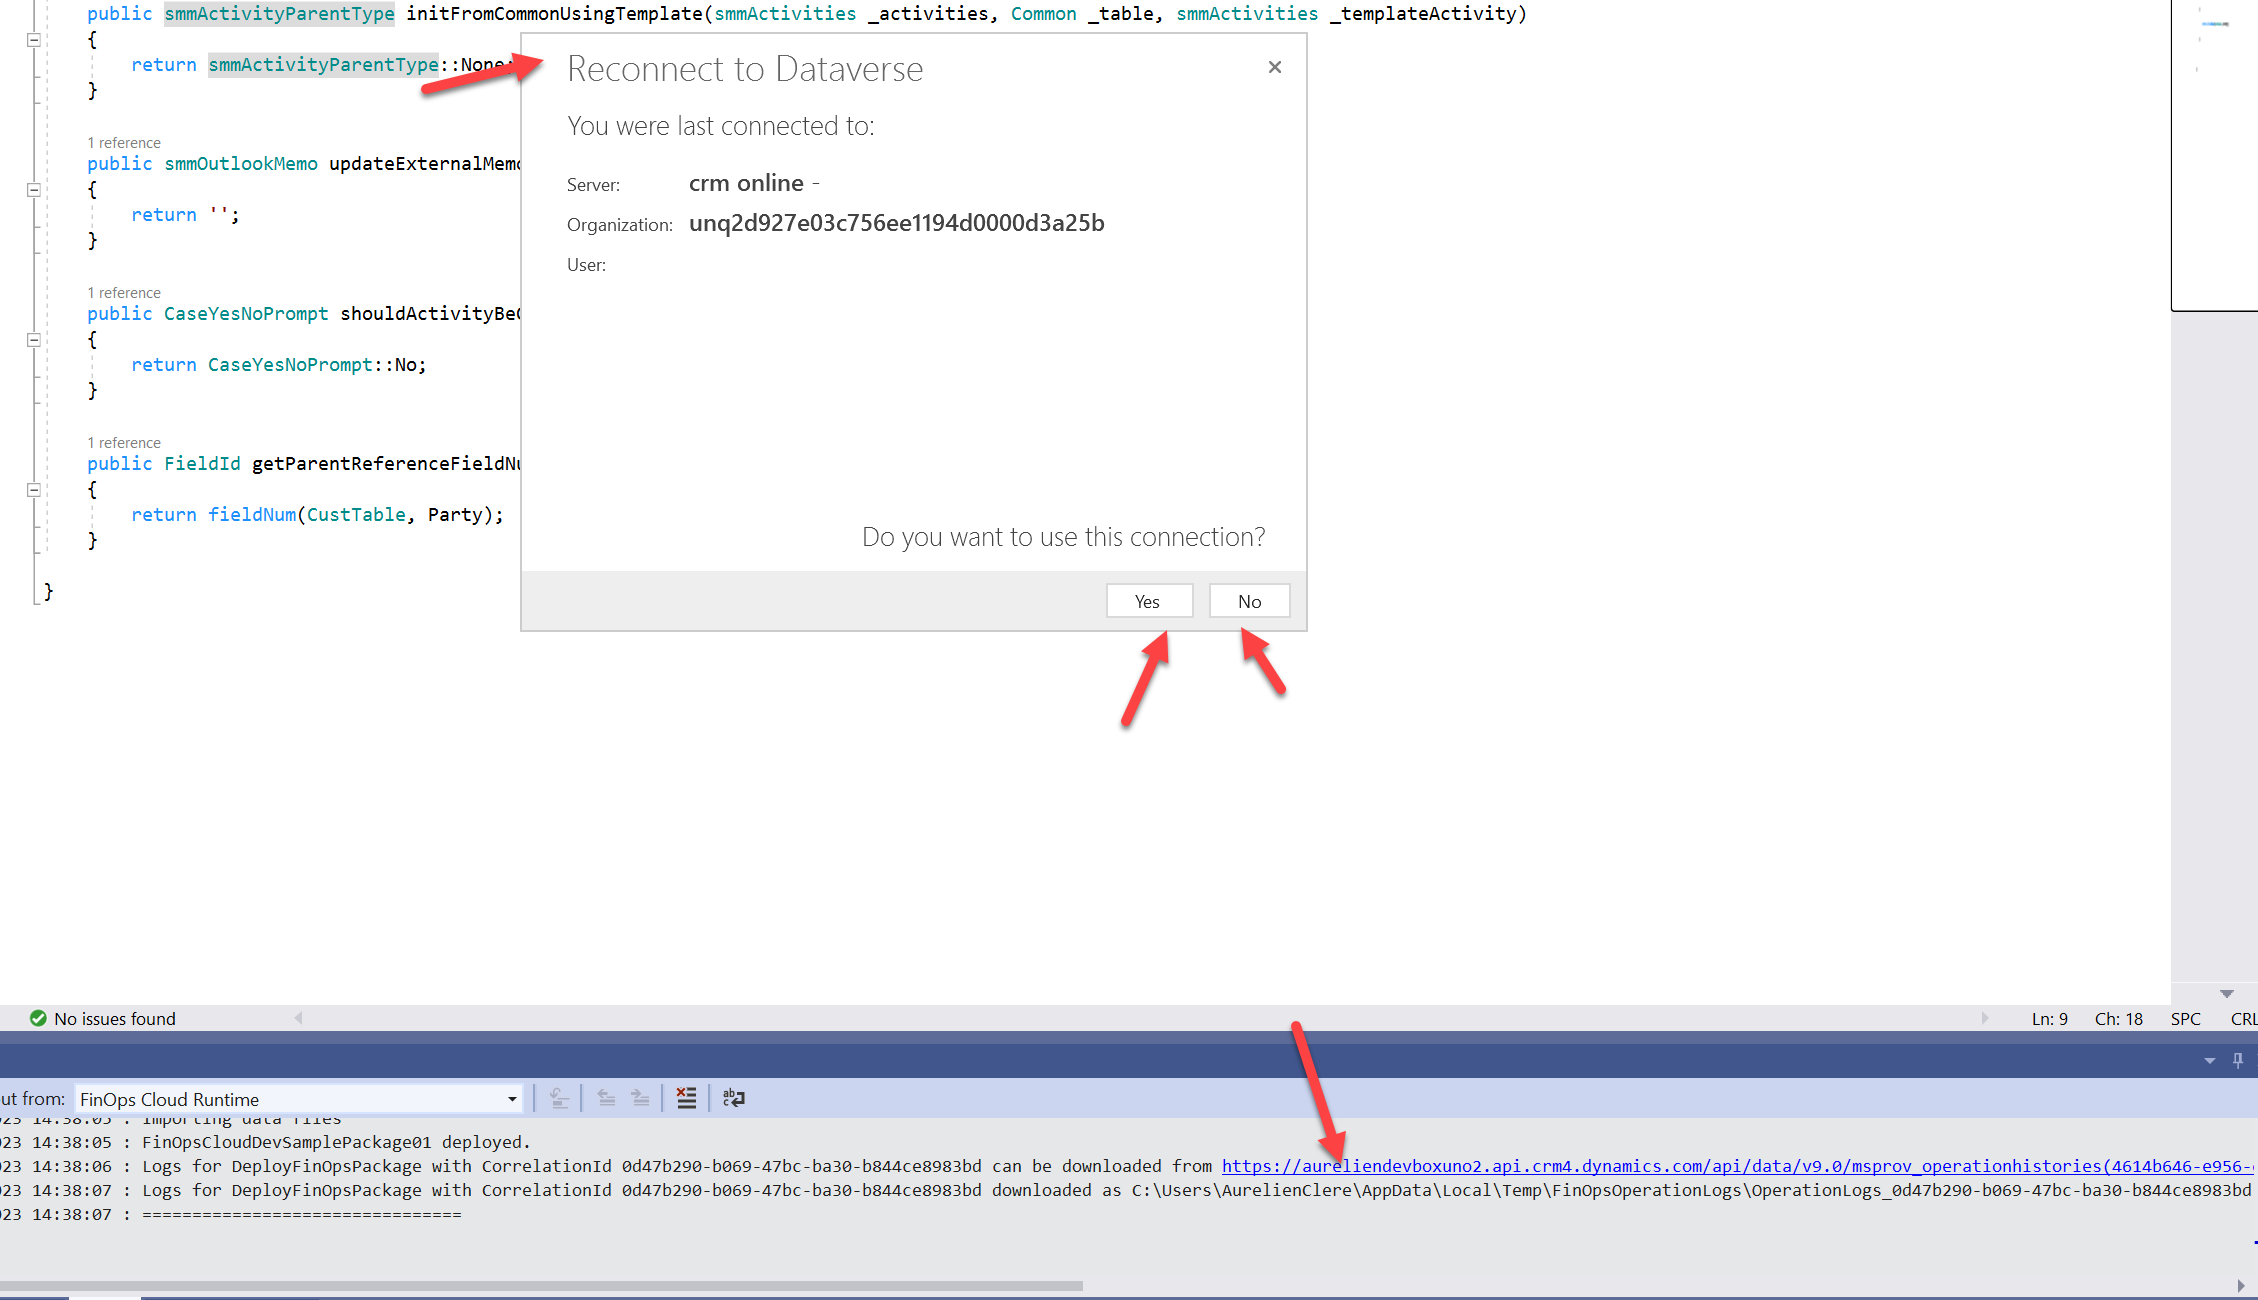
Just Remember also to be always connected to the right Dataverse ! (Especially if you are switching from Customer A to Customer B) - good thing is that VS can have multiple accounts, from different tenants, and also again different DevOps/Workspaces
Otherwise, you could deploy your code to the wrong customer :/
Or you could do it manually after build locally.
And again one more thing : delete previous models already deployed on it.
Of course, you have to deploy it on the Cloud to start debugging. So I will assume it’s done on your side.
Add the breakpoint you want in the code of your VS Project (same as before of Azure Cloud Hosted)
Just click on “Launch Debugger” and that’s it ;) you will see a very good performance in loading the symbols locally !
And VOILA ;)
Of course, you can rebuild the whole model like before, RESYNC full also. But don’t forget to click on this option too (NEW)
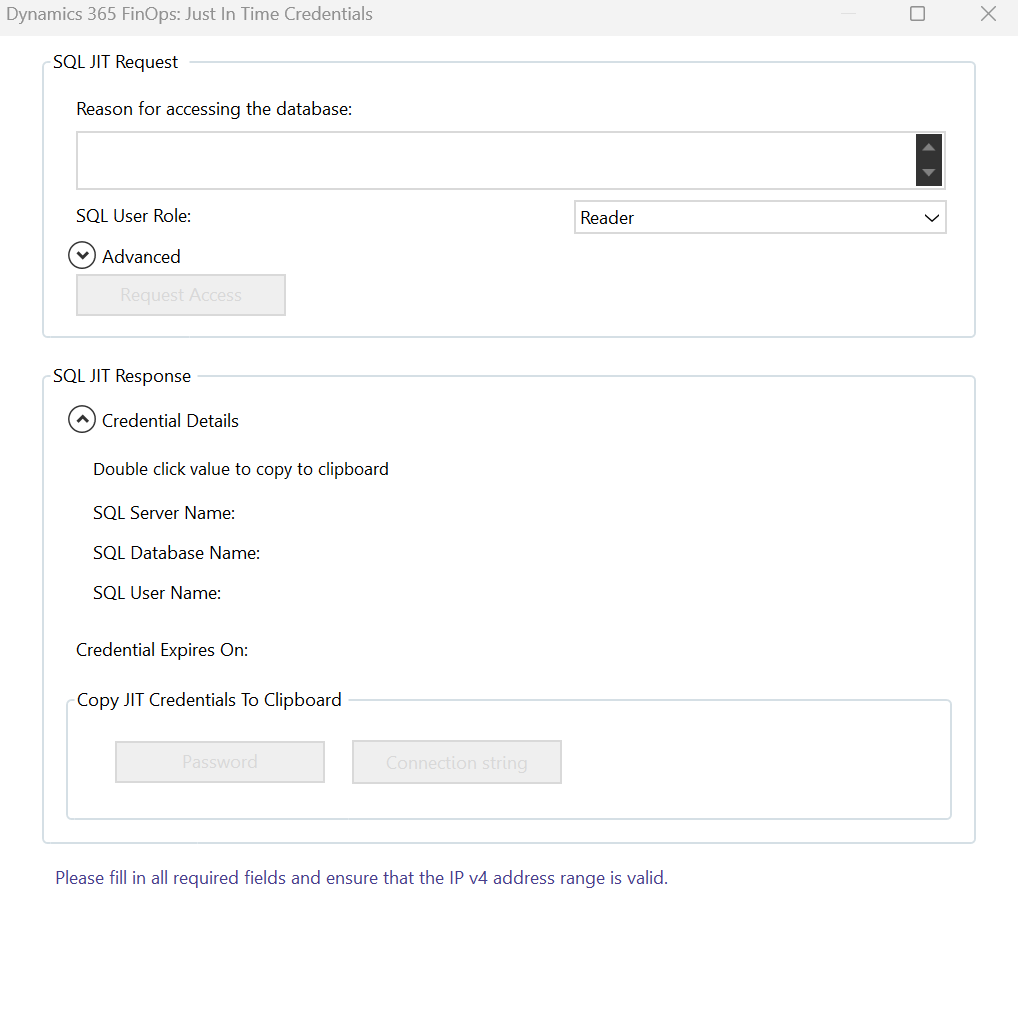
The only “missing” point for DEV part, is - as of now again - we can’t access the SQL Database remotely (like we can do in Tier2 via Just in Time Access / JWT) - or I was hoping to have the same way we can have for Dataverse / CE : TDS Endpoint. But they are working on it ! Don’t know if it will be read only or writting too.
Now, you can check also deployment to the Model Driven App in the Maker Portal Power Apps - to the right Dataverse.
Globally, you can download again the log of each operations, even you didn’t have selected this option in Visual Studio Option. (like explained before)
To conclude on the DEV side, I will add maybe more things in the coming days but it’s really impressive, in terms of performance (even in Public Preview)
Maybe some strange error popup can be seen, but overall it’s very magic ! Especially again because you have 1 laptop and can work on several customers, versions, compile & debug like we always wanted to have since the beginning of D365 F&O !
Last, in this way, it’s really also a good step to do part of DEV in CRM and part of DEV in ERP - like presented few months back in this article and what I have show in F&O Summit in Lisboa in March 2023.
ALM / Data ALM
And final chapter, with my most wanted topic ! Dev Ops and CI/CD has been changed with this global new feature of Unified Developer experience.
Again, first you have a MS Doc Learn article that you can read.
To jump on this topic. You will have again 2 paths. 1 still is the same as we used to do : DEV in UnO DevBox (locally in VS) - commit in Dev Ops , build in X++ (Nuget packages) , Release Pipeline through LCS API to launch your LCS Deployable Package.
1 is new, and it’s what I will explain here.
This brand new path/way to do CI/CD is the future, and it’s also because as you can maybe notice, your UNO DevBox is only visible in PPAC and not LCS anymore. So when all environments will be only in PPAC and not LCS, this will be the only way to deploy your package.
Here in my example, I have 1 UnO DevBox where I do my DEV , and let’s say 1 UnO dev box is like a TEST/QA environment, and want to deploy the code on it (compiled)
Globally in Dev Ops you will need 2 Dev Ops Extensions :
The one and only : F&O (well that doesn’t change here)
The Power Platform Build Tools : new for F&O folks.
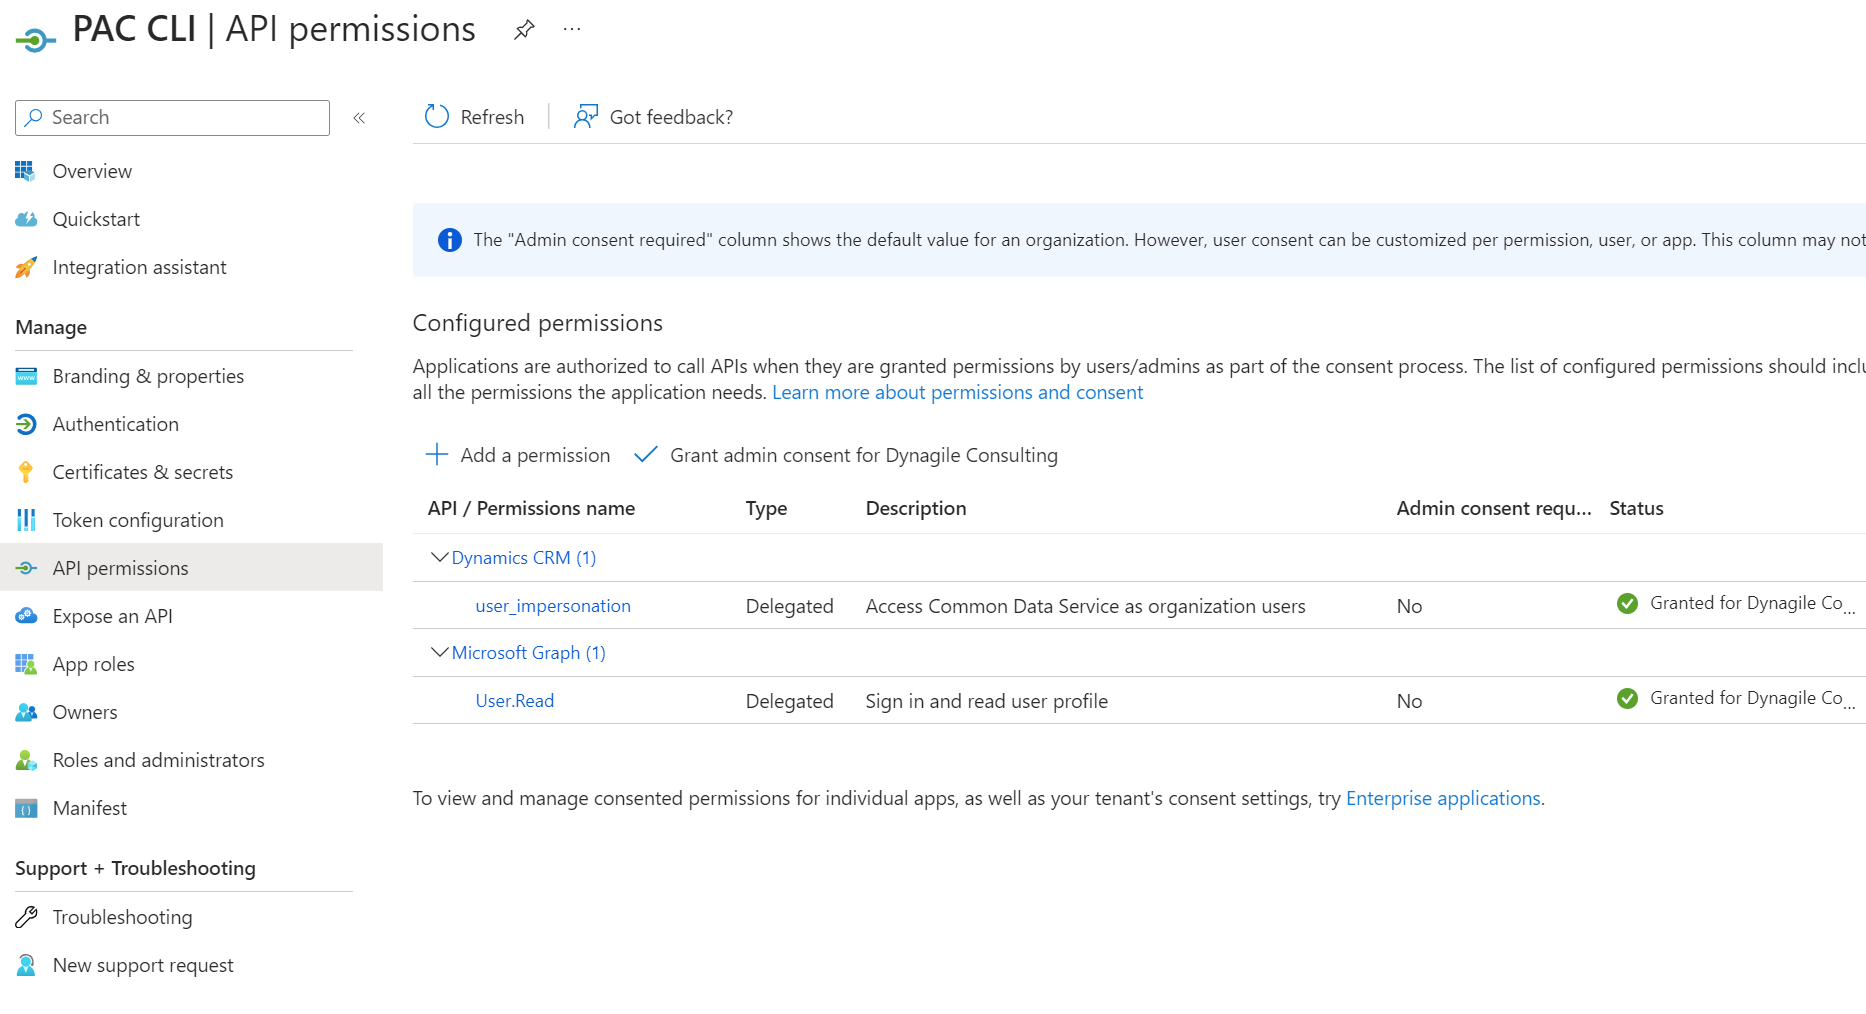
In order to setup that, I will first suggest creating an Azure App Registration in your tenant for PAC CLI in order to create your connection for Power Platform in Dev Ops and make the config/setup for the Power Platform Extension.
Note the client Id, client secret, tenant Id, and give permission to Dynamics CRM (Common Data Service aka Dataverse)
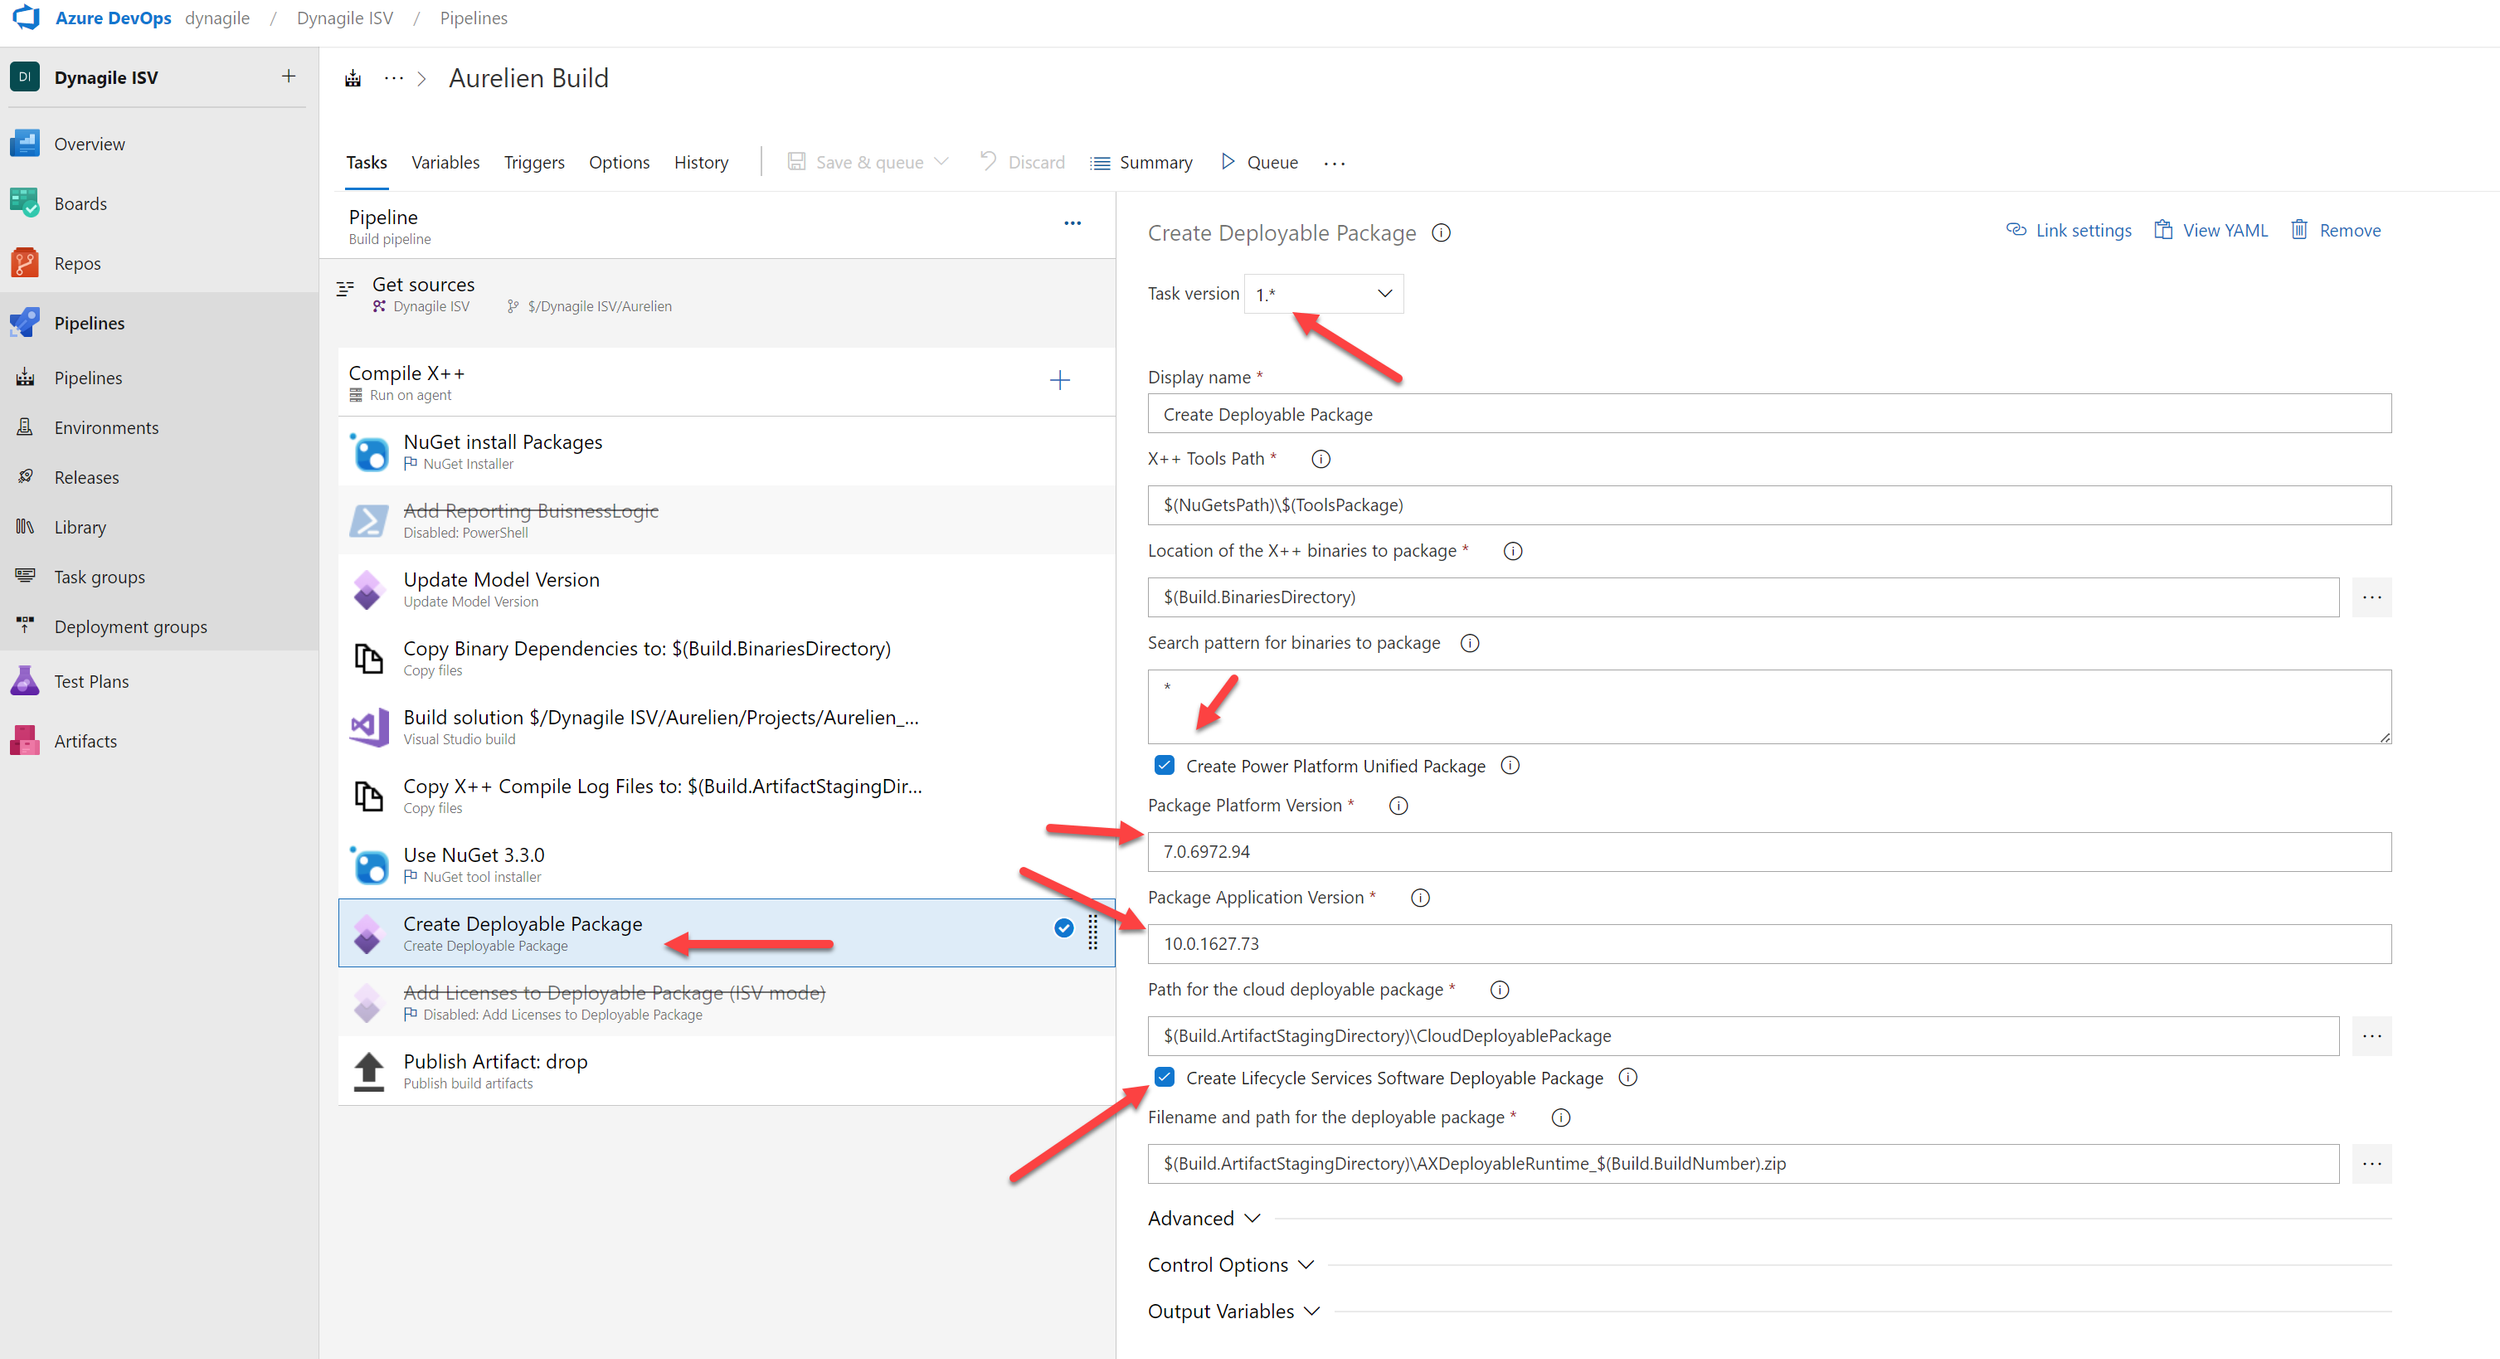
On the DevOps build pipeline, you need to update the step where we always have “Create Deployable Package” and use the latest version of the F&O extension : here 1.* - the other steps don’t change at all.
You will find 4 new parts :
Create Power Platform Unified Package
Create LCS package
Package Platform version
Package App Version
For points 3 & 4 , don’t know yet why we need to put the version: didn’t try to leave it by default. In my example, I put the 10.0.35 version (the same version as the one I want to deploy my code)
For points 1 & 2, it’s here where we can already generate the new type of package (UDP) and still generate the “old” mode : LCS DP.
Also generating UDP (Unified Deployable Package) can be done locally on your own laptop via ModelUtil.exe which has been part of F&O asset you have downloaded and extracted before in the DEV side.
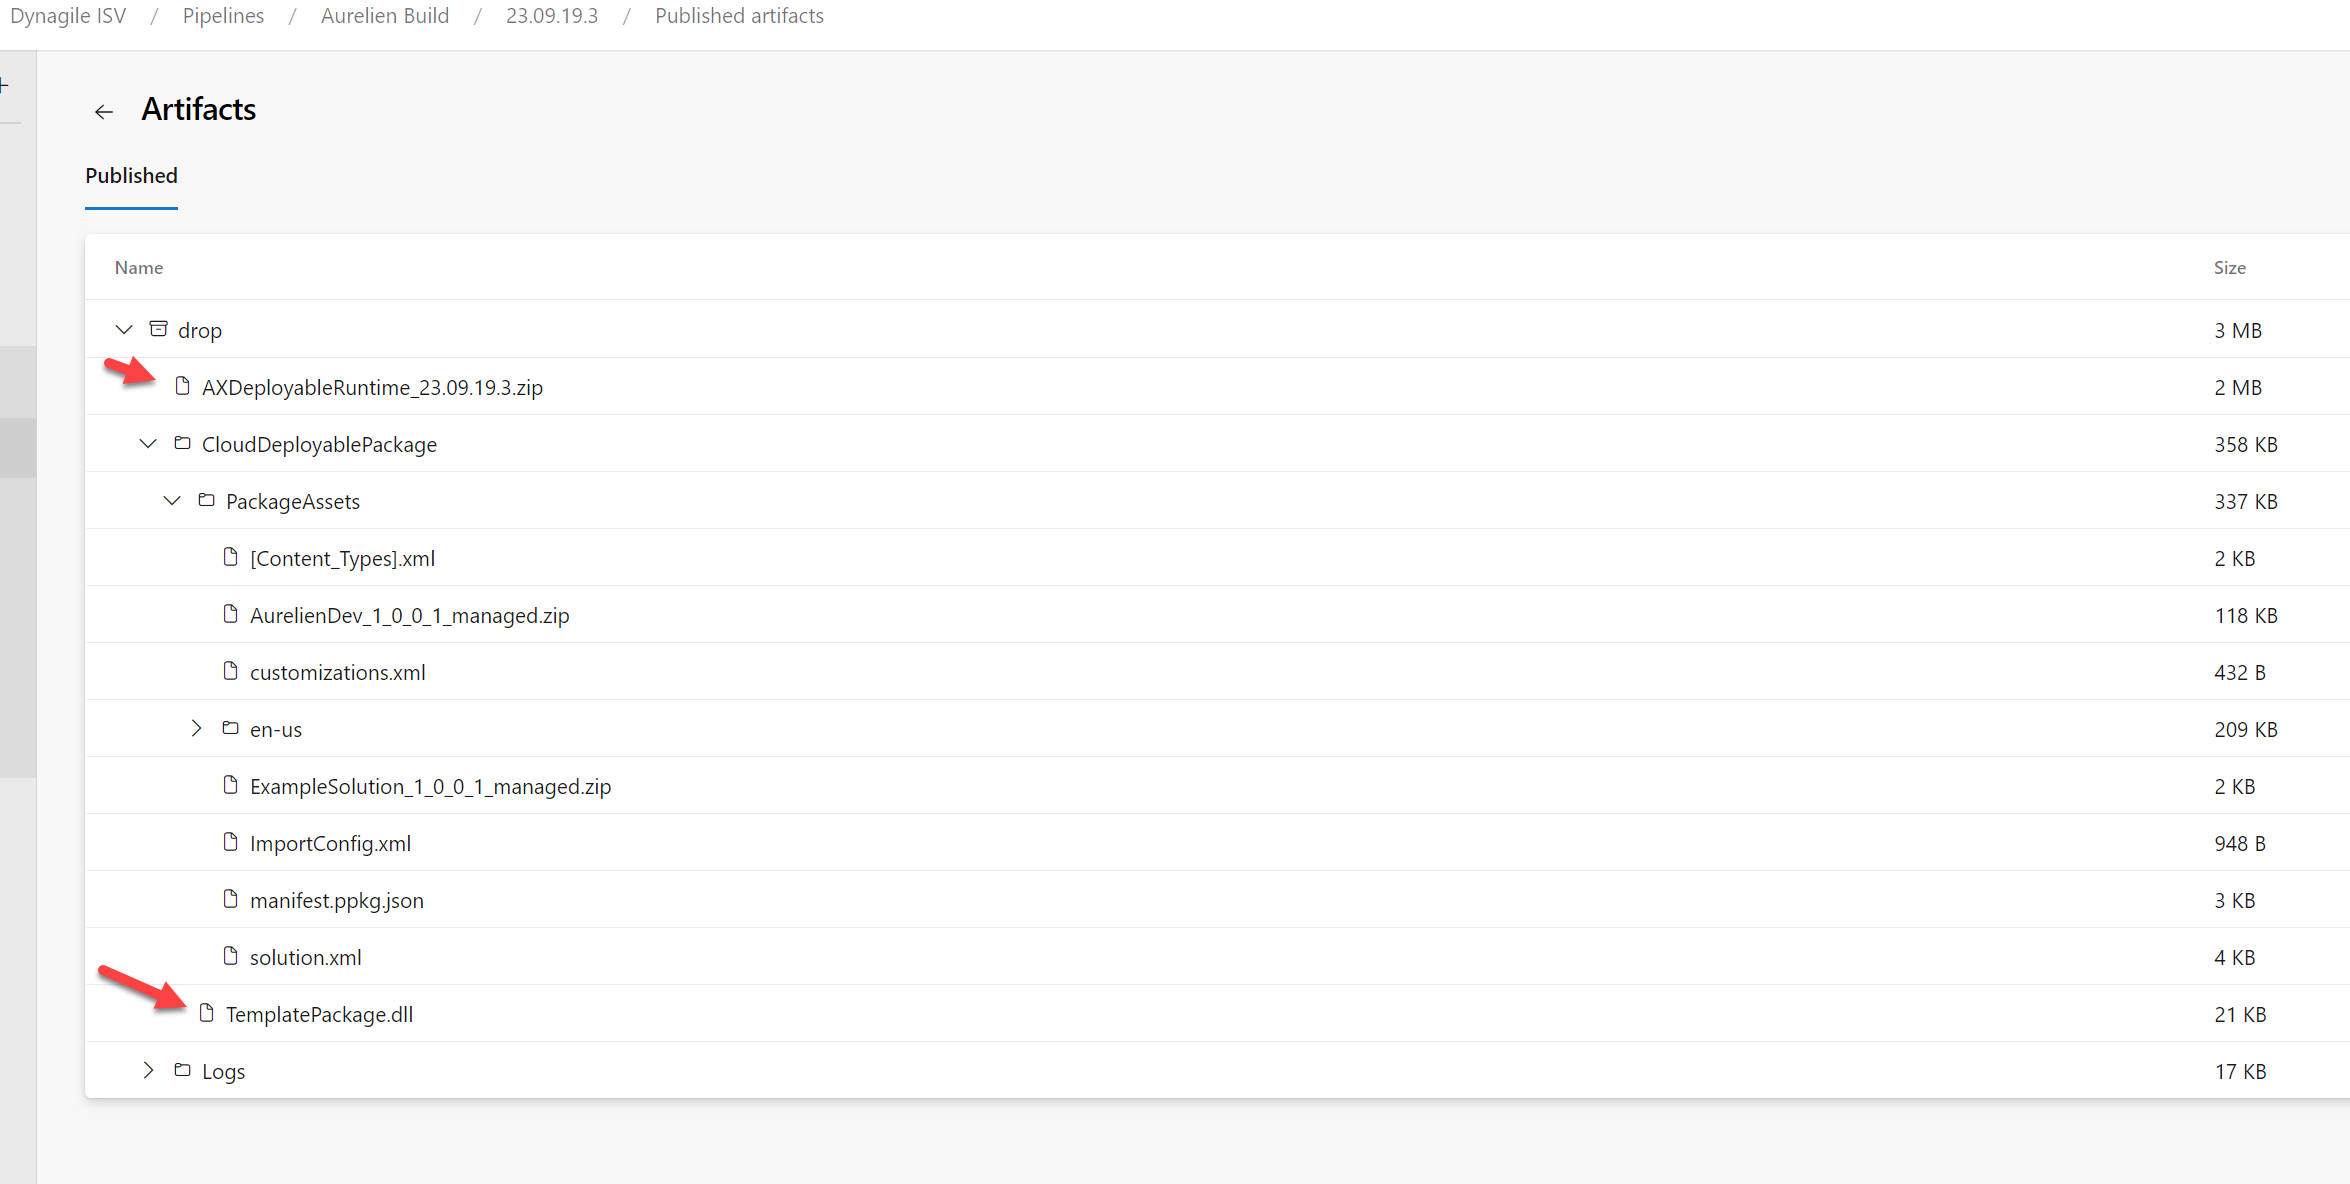
On the output of the build, you still have the LCS deployable package.
But we have now new stuff : CloudDeployablePackage, including the DLL generated that we will be the artificat that we will release on the Dataverse side.
Go to the release pipeline now,
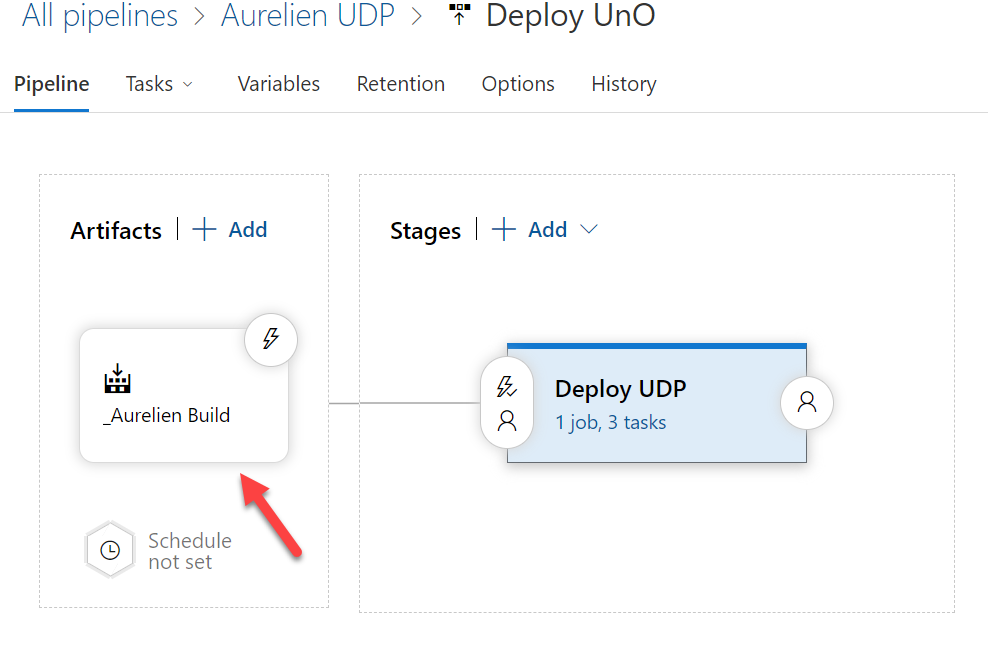
Create new one, pick the Artificat coming of the build you have updated or created before.
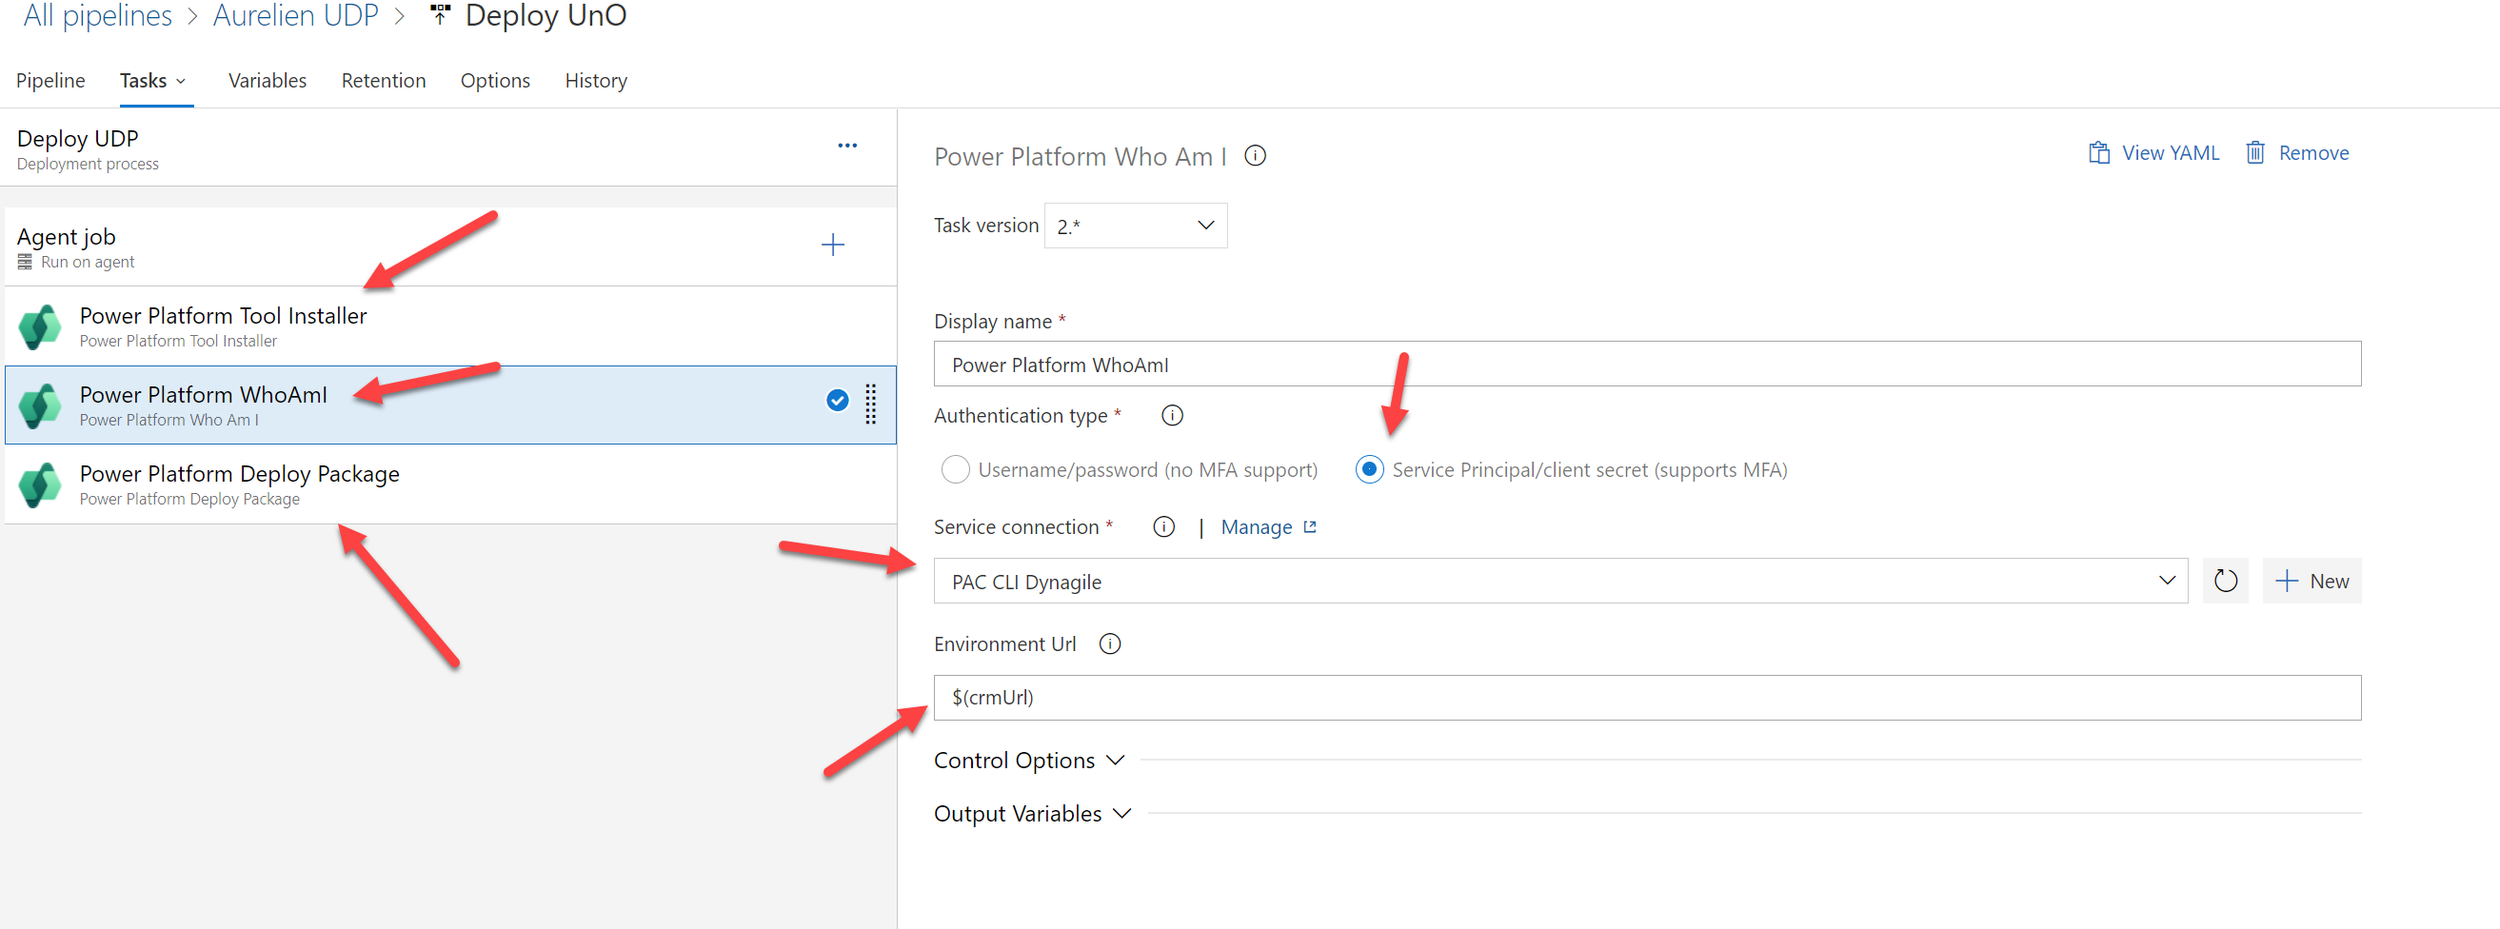
Add PP Tool Installer at first step
2nd step : Who Am I is there to try & verify if we can connect to the Dataverse : I use the Service Principal that we have created before with the Service Connection - the server authentification URL on PP is 1 PER Environment; so create several service connections for each of them
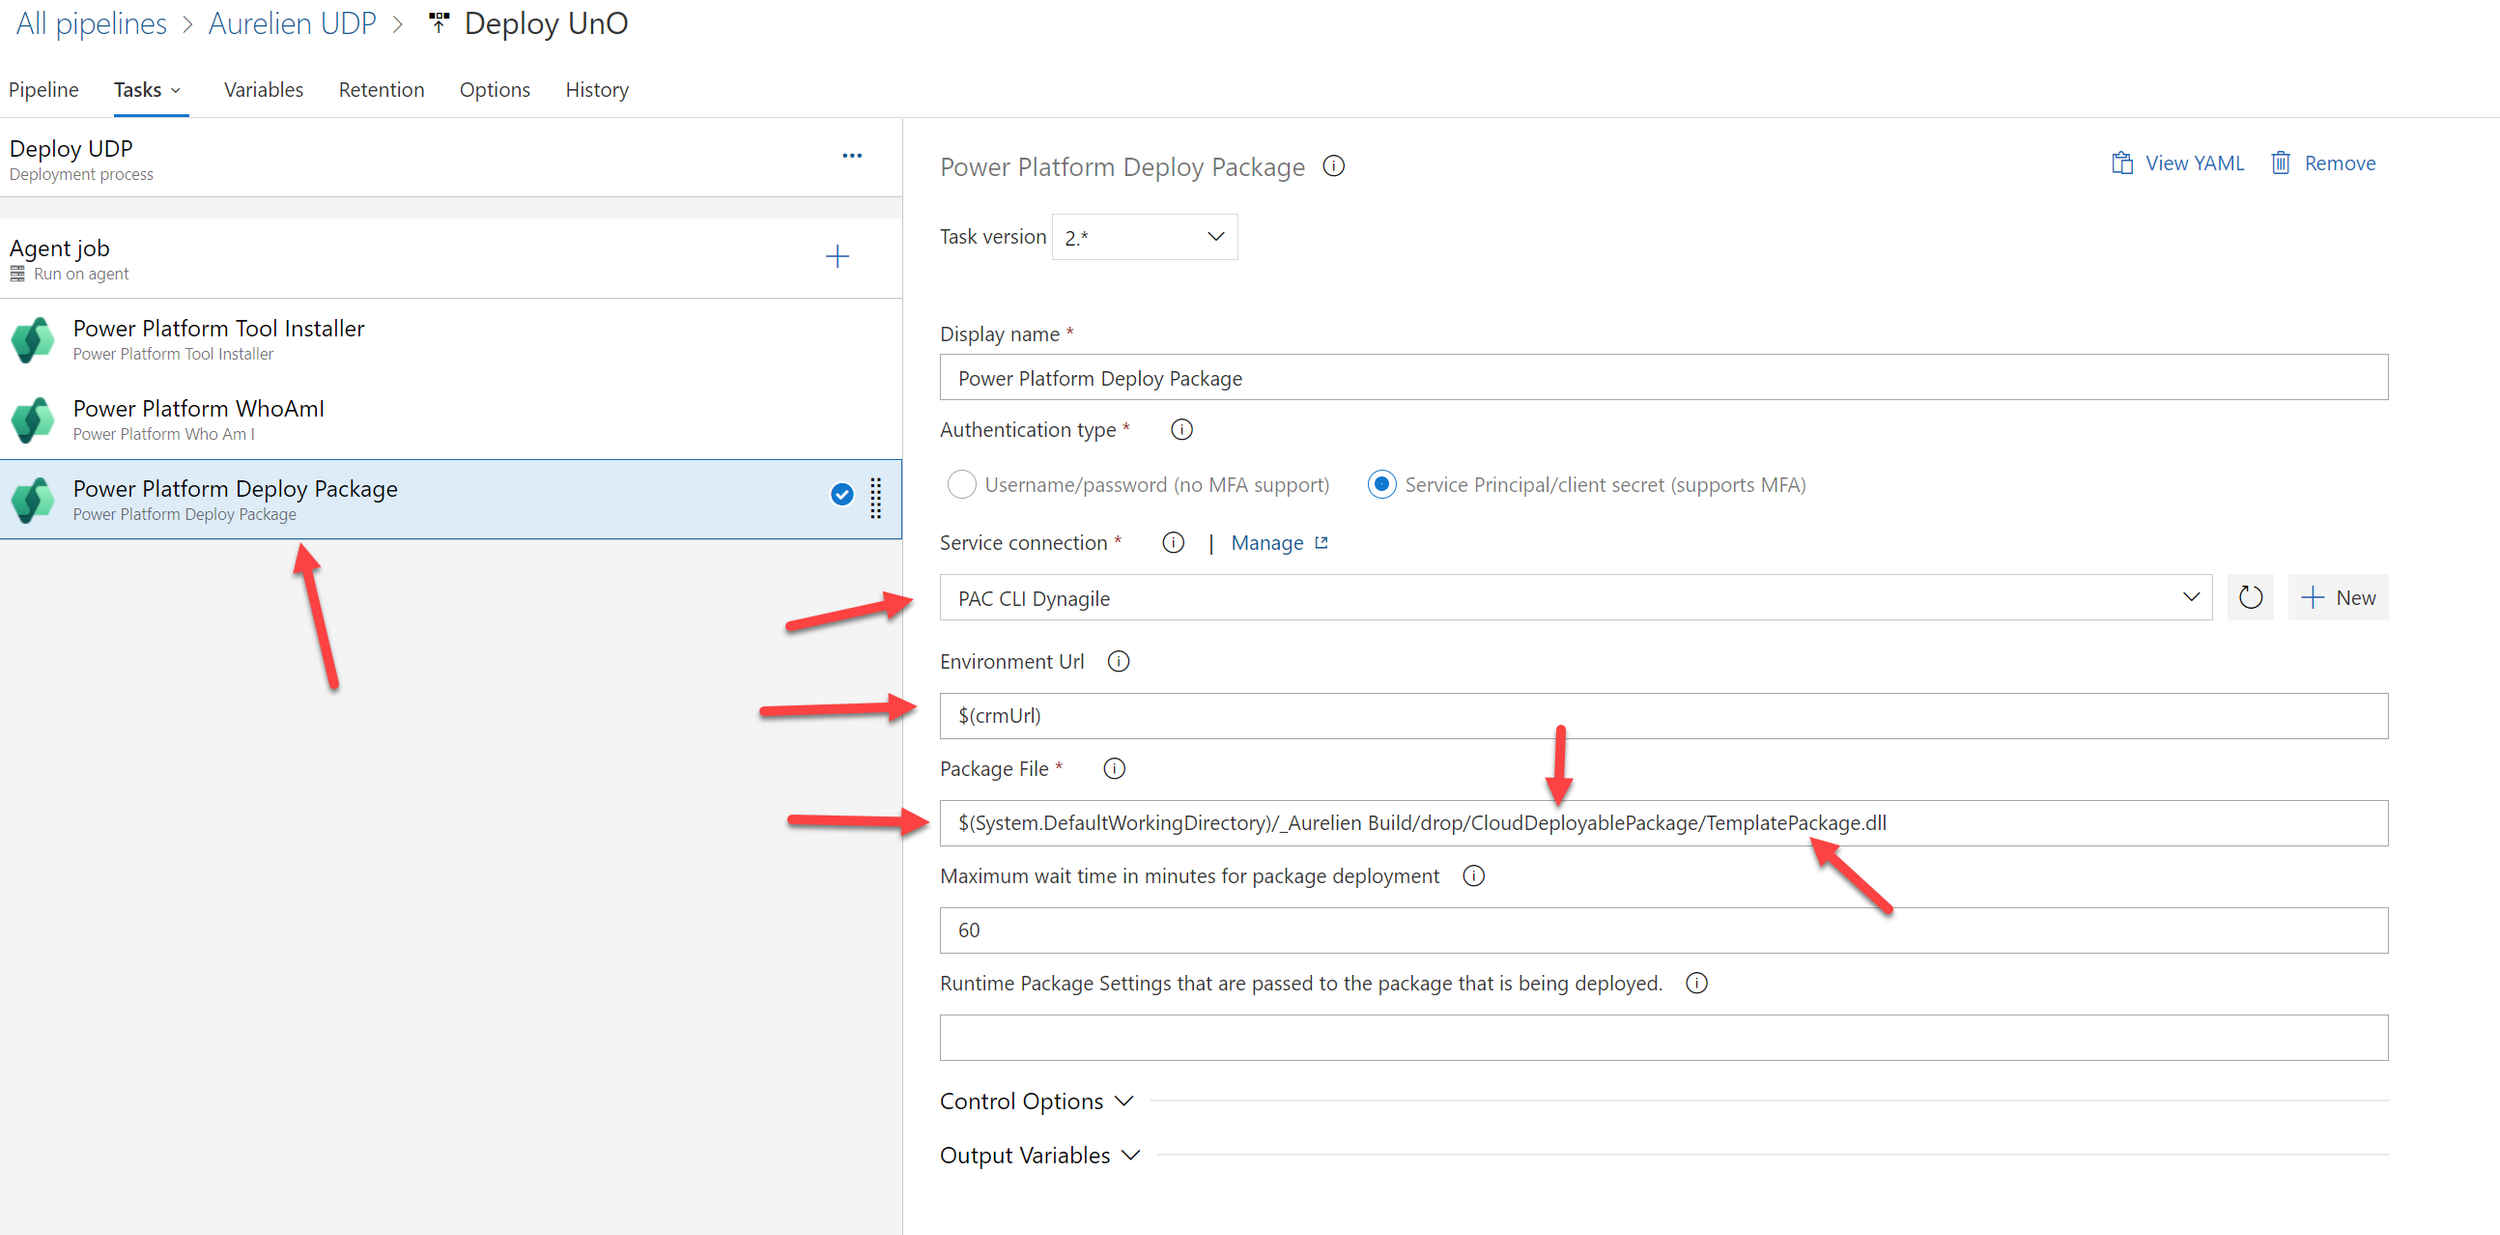
At the last step, to deploy package.
Same service connection as before
Put the Environment crm url that I will show after
Package file : This is quite difficult you have to put it manually… (yet) - will be always : $(System.DefaultWorkingDirectory)/_YOURBUILDNAME/drop/CloudDeployablePackage/TemplatePackage.dll
My Crm Url variable is the CRM/CE URL of the Dataverse (not F&O) - the one where I wanted to deploy my DEV on F&O side (the UNO DevBox that will be my TEST environment)
Make sure also you have added the Azure App Registration to the dedicated target environment you will deploy your package. For that, go to PPAC, and add your Service Principal as System Admin
You can trigger the release manually or could be automated of course (based on the Build Pipeline before)
See the time ! 15min (not 1h like LCS deployable package)
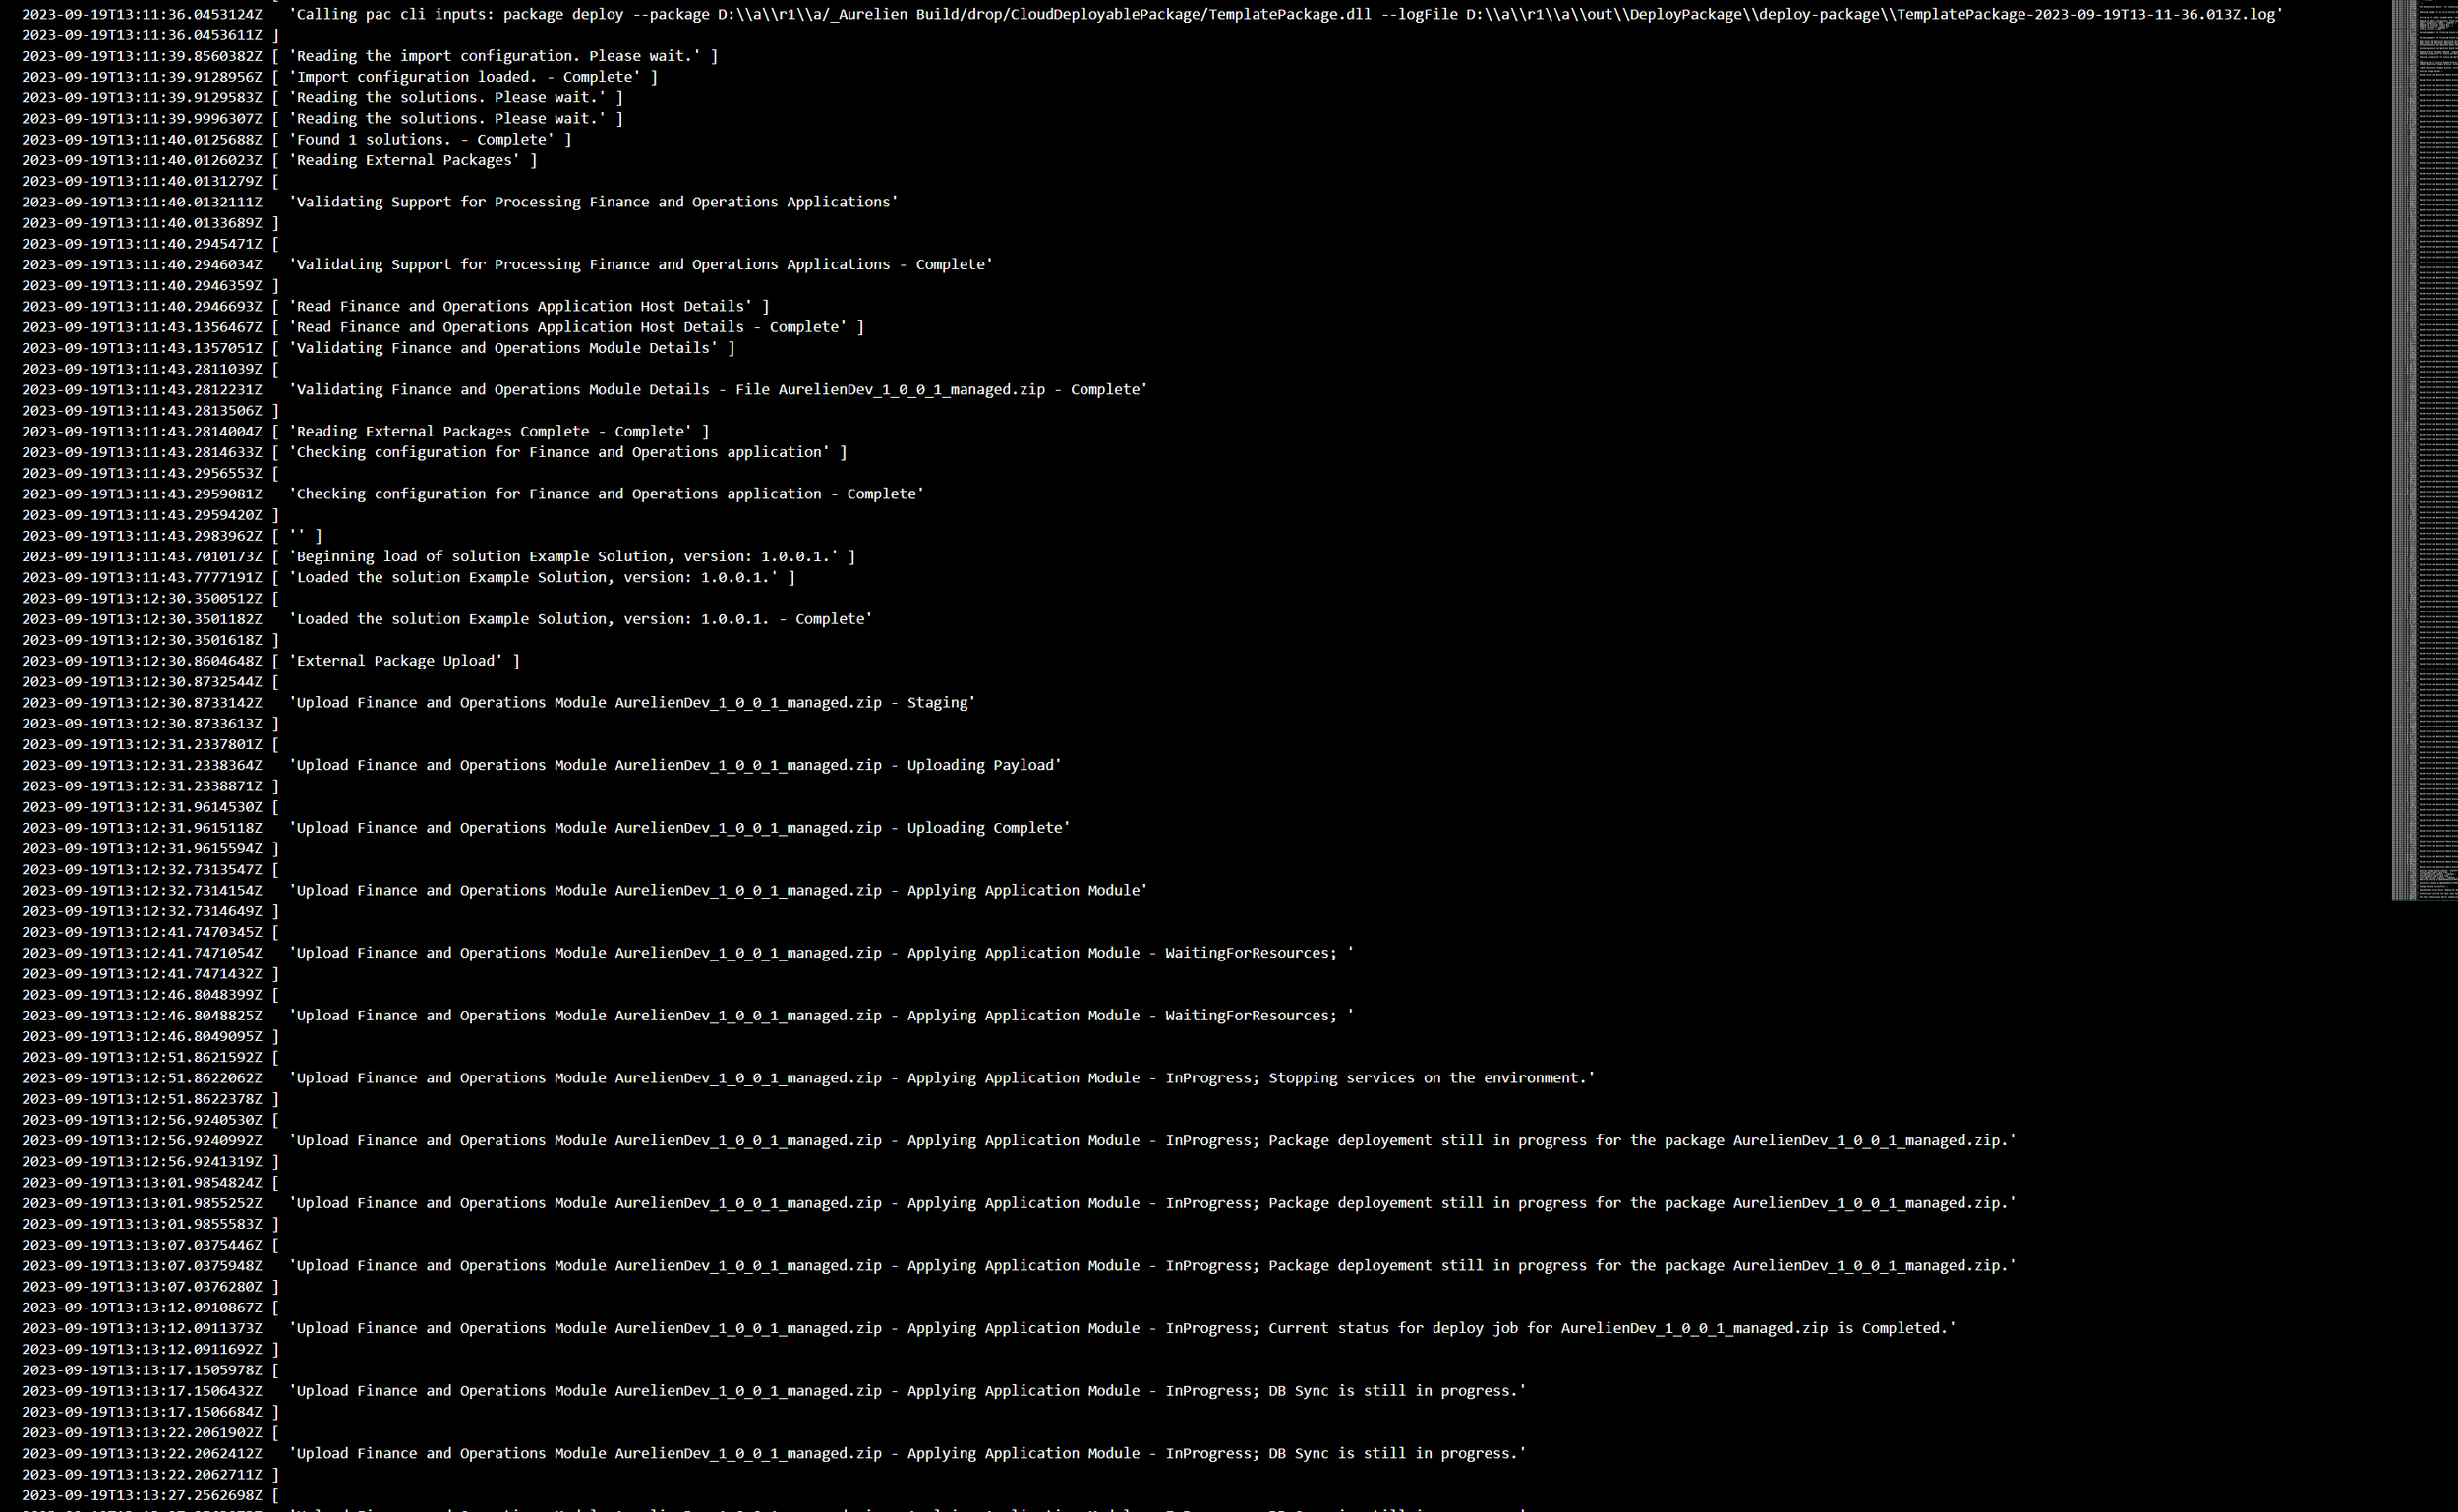
You can deep dive on the logs behind the scene
Like before, you can also check the log on the Model Driven App you have deployed your UDP
For Data ALM, you can copy of course through PPAC UI , before jumping on it, please read the terminology differences and also you have a complete tutorial of Microsoft that you can read it too.
Like here between 2 UnO DevBox through PPAC (same datacenter)
Again, you can still use the LCS API and Data ALM I used a lot of several years (including my Data ALM Solution explained in my article & GitHub)
But, here now, even for environment like TIER2 or Production instance that has been deployed via LCS, if you have already created & linked in 1:1 a Dataverse behind, there is way to just copy production database directly to your new UNO DevBox deployed ! Yes you are not dreaming, this is really a LARGE enhancement. Remember before via LCS, you had to copy Production to a Sandbox, backup that and restore it manually via SQLPackage… take like multiple hours even 1 day to do that, now you will see 1h30 and 2 clicks, even can be automated via DevOps using the Power Platform Build Tools and also without an Service Account without MFA that you need for LCS API (security not happy about it), here we will use again the same App Registration / Service Principal we have used before.
First, on the Dataverse of your production or Sandbox TIER2, you need to install the Finance and Operation Deployment Package Manager solution.
Go to PPAC UI, and go to Dynamics 365 Apps
The Dynamics 365 F&O Platform Tools needs to be installed on the SOURCE and TARGET environment where you will do the automatic copy. On my side the target is my UNO DevBox where we have launched the PowerShell provisioning : it was already installed. My source is my LCS TIER2 Sandbox (or could be your production), it will not be there by default, so make sure it’s done before going further.
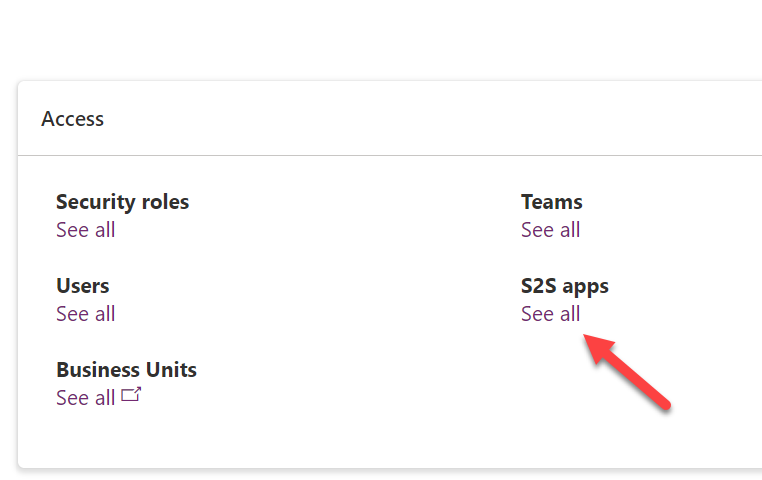
Make sure, you have added the Azure App Registration (#PAC CLI) created before in S2S App in PPAC (for both environments)
Last remaining step before going to DevOps to do the automation process, you have to convert the last LCS deployable package you have installed.
This part will not be needed in the future, where we will always install this new type of package : UDP like explained in the ALM just before. But in the meantime, I didn’t install this type of package on my Sandbox. It’s mandatory, the copy process will take the D365 F&O Version + Data + Code. (like a real complete “copy/paste” globally).
Go to the LCS Asset Library, and download the latest DP you have deployed there on the source environment (so here my TIER2 LCS Sandbox)
Launch Powershell : .\ModelUtil.exe -convertToUnifiedPackage -file=<PathToYourPackage>.zip -outputpath=<OutputPath>
ModelUtil.exe can be found in the PackageLocalDirectory (remember the source code that you have extracted locally before) in the sub-folder “BIN”
Upload the unified deployable package to the source environment
This deploy command doesn’t make any changes to the finance and operations environment hosted in Lifecycle Services, nor does it require any downtime to apply this package on either the operations environment or the Dataverse environment. This is done to upload and save the customizations into Dataverse storage so that they can be copied.
Install PAC CLI
Run the following:
pac auth list
pac auth select --index 1
pac package deploy --logConsole --package <OutputPath>\<Package>.dll
Remember here again, the TemplatePackage.dll coming as the ouput of DevOps when we have generated our UDP from the Build Pipeline : same thing : normal
Now we are good to go, let’s go to Dev Ops and create a new Pipeline like me : just 2 steps now :
Source Url and Target Url are variables like below, the CRM Url not the F&O ones again. Just you will need to create a specific new Service connection linked to your target environment.
And that’s it ! you can launch it manually now, you will see that it will take around 1h/1h30 in average, like a “standard” copy through LCS API or manually via a refresh in LCS Portal UI : the time doesn’t change here. This is changing if it was production, 1H30 after we are good to go in my DevBox.
You can schedule this pipeline (every night) or also just before automatically after a deployment from dev ops to Sandbox TIER2.
So really UnO DevBox can be seen like “throwaway” environment, you can erase, reset, re-create, delete models, copy database very fast and not wait several days before doing development…
That is the end of the article, hope you enjoyed it ! It’s a large one, but I will do a video just below (I guess it’s often better to see it LIVE in actions)
Don’t forget to share it, and also ask questions just below. See you next time !
Update June 2024 : GA version
Globally, what we have now (that have changed since I wrote this article in September 2023 when it was in Public Preview)
VS 2022 only supported version (not more VS 2019)
Access to SQL AxDB remotely
Automatic Setup on VS 2022 when connecting to the Dataverse
Converting UDP automatically when any release via LCS (before it was manual before starting the copy)
Less-Transaction Copy
Create an UDE Environment with the right version you want at first
Apply Service Update (Microsoft version) on existing one.
Roadmap updated
Access to SQL AxDB remotely
You can now access in VS 2022 a new menu item to ask access to the SQL (AxDB) remotely, kind of similar as TIER2 back then in LCS : Just in Time Access
Automatic Setup on VS 2022 when connecting to the Dataverse
Now, it’s kind of very straight forward setup, easily done all automatically like this :
•Create a folder in the path "C:\Users\[USER]\AppData\Local\Microsoft\Dynamics365" with the build number of the environment to which you are connecting
•Download the specific build metadata in a .zip file
•Download the cross-reference DB for that build
•Download the D365FO extension for VS studio
•Download an installation for the Trace Parser
•Unpack the .zip metadata file with creating the folder PackagesLocalDirectory
•Delete the .zip file
•Install the .vsix D365FO extension
•Create a new configuration for the connected UDE with the newly downloaded cross-reference DB
Converting UDP automatically when any release via LCS (before it was manual before starting the copy)
Remember, during preview, it was necessary to convert your latest Deployable Package (DP) applied to a TIER2 or Prod Instance on LCS, before starting the copy to the Unified Dev Experience Environment (UDE). Now the package is automatically converted as UDP and applied too. So, well, globally, when you want to start to copy (remember it’s a global copy/paste : F&O, version, code, Dataverse too) you don’t need to do it anymore. Just start the copy right away in PPAC. Since it’s quite new feature, please re-apply a package in LCS before starting to have this improvement.
Less-Transaction Copy
Since we were talking about copy environment, as you know, storage is now the key. In order to reduce that, Microsoft have released a new way to decrease it. You can now for UDE environment avoid to globally copy everything and keep few transactions, after all every developer don’t really need always to have ALL things on it. The way to do that, is through Powershell / PAC CLI. Remember you need to learn PAC CLI, you are now a PP Admin ;)
Table Groups truncated by default are:
i.Transaction (4)
ii. WorksheetHeader (5)
iii WorksheetLine (6)
iv. Worksheet (9)
v. TransactionHeader (10)
vi. TransactionLine (11)
vii. Staging (12)
#Install the moduleInstall-Module -Name Microsoft.PowerApps.Administration.PowerShell# Set variables for your session - Power Platform Environment Id$SourceEnvironmentID = "YOUR_SOURCE_ENVIRONMENT_ID_HERE"$TargetEnvironmentID = "YOUR_TARGET_ENVIRONMENT_ID_HERE"Write-Host "Creating a session against the Power Platform API"Add-PowerAppsAccount -Endpoint prod$copyToRequest = [PSCustomObject]@{
SourceEnvironmentId = $SourceEnvironmentID
CopyType = "FullCopy"
SkipAuditData = 'true'
ExecuteAdvancedCopyForFinanceAndOperations = 'true'
}
Copy-PowerAppEnvironment -EnvironmentName $TargetEnvironmentID -CopyToRequestDefinition $copyToRequestCreate an UDE Environment with the right version you want at first
The best way is always to use PowerShell / PAC CLI ; but you can also do it via the PPAC UI directly. Please be aware to install the D365 FnO Platform Tools BEFORE
I can pick an existing Dataverse and start provisioning F&O instance on it ; and selecting the right version I want. Please follow instructions to create a DV org and add FnO using Finance and Operations Provisioning app https://learn.microsoft.com/en-us/power-platform/admin/unified-experience/tutorial-install-finance-operations-provisioning-app
(Preview version of FnO is available at the time of provisioning only if your DV Organization was provisioned with Early release tickbox)
Apply Service Update (Microsoft version) on existing one.
Just go to PPAC, existing UDE already deployed, go to D365 apps, Provisioning App and the “…” Manage ; you will able to apply a new version.
The last digit (10.0.39.6) correspond to the latest train of Quality Update of this release
And finally - remember it’s just a microsoft roadmap (subject to change… :))
Image shared by Microsoft. Disclaimer : dates could change
Update >= April 2025
I am updating as soon as I can any new major update about UDE/USE or migration or Unified Admin that we are all waiting for to come in Preview/GA or any new things coming up. It was time for me to update a little bit with what I have just found today in April 2025. And thank you for all your comments and Q&A at the end of this article still almost 2 years after, when it was in Public Preview and thank your for all the attendees that joined/will join sessions on a lot of events I do in the world for this hot topic ! Next ones will be DynamicsCon and DynamicsMinds.
Microsoft published a way to provision an USE (like a TIER2) directly in PPAC. Thanks to my colleague Quentin that discover it before me ;)
USE is for : Unified Sandbox Environment , so you will not be able to do any DEV directly via VS locally, instead it’s a like a TIER2 without LCS yes ;) => Again no more TIER3,4,5 or Perf environment in PPAC.
Of course you can use it for TEST environment and push any code via Unified ALM in DevOps like explained before in my article (via an UDP and Power Platform Pipelines) - Finally don’t use USE right now for Golden Config/Ref environment as you can’t push it to init a Production yet. Consider it like an UAT, PrePROD or Datamigration without buying a TIER2 license, just with enough storage as usual in PPAC… :)
Right now, you have 3 templates in Preview : Finance, SCM and Project Operations. Of course, those templates include also some Addins preinstalled for you, like for SCM you will have Planning Optimization.
Bad side right now, you can’t choose the version in this way. it will be always the latest one in GA, here it’s 10.0.43 and also always with contoso database.
For that and if you need an USE in 10.0.42 or even with blank database (no contoso demo data) for example, please still use the old way => you need to create a blank Datavarse with D365 apps to “None” and then install F&O Power Platform Tools and Provisionning App after without the DEV activated, this will create an USE and with the right version you want and w/out contoso demo data. And bad side of that, you will not have all the preinstalled Addins like Planning Optimization, so you will need more time to finish installing everything you want in terms of extra addin.
You can’t also activate multiple ones at same time, you need to pick Finance OR SCM OR ProjOps
It’s also possible to activate it to an existing D365 CRM/CE/Dataverse and install Finance right after. Again it will be an USE (so like a TIER2 in the old past LCS)
Right now, you can’t provision a Production (because Unified Admin isn’t in GA yet), but it will be in this way in the future - without Fast Track pre-approval. So now you know how it will be. Of course it’s still very recent, so I guess Microsoft will add other preinstalled Addins and fix any bug.
When you launch the creation, just wait 1h30 in average and you are ready to go and use ! No things to add, despite giving access in Dataverse and F&O to the user. I also take this opportunity to add 1 more thing about the CreatedBy of all those environments (like UDE or USE). As you know in LCS the F&O environment admin is the one deploying or also could be on behalf of someone else. You can also change it afterwards. You can’t do that right now in PPAC, the one creating it, is the one as the main admin and can’t change be after. So if you copy a Production Database after, the only one activated in F&O will be the one that I have created the environment at first in PPAC. So in the meantime, please be aware of that ! Do it via a Service dedicated account and not a personal account as the one creating the environment could leave your company ;) Hope it will be possible to have an option to change it like in LCS in the future !
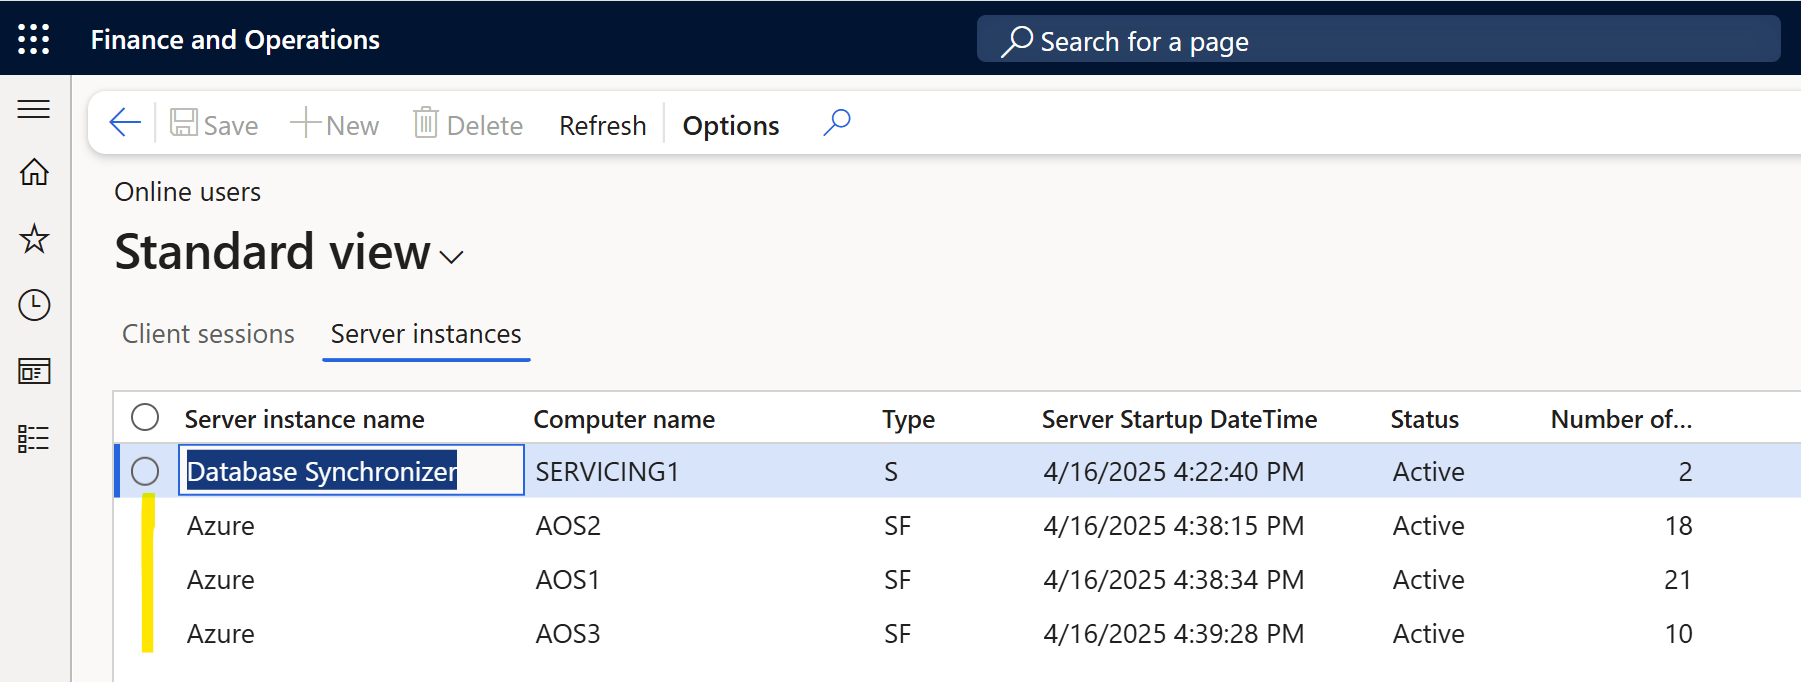
For USE, you will get 3 AOS, like a TIER2 in LCS. So this is the change between an UDE which have only 1 AOS.

